Welcome to ClassEdge
ClassEdge is your school's all-in-one learning companion. As a student, you can use the app to:
- See what's on your schedule right now and what's coming up next
- Open your courses and browse lesson materials
- Take assessments and review your scores
- Read announcements from your school and teachers
- Check upcoming events on the calendar
- Manage your profile, academic records, and financial records
The bottom of the app has tabs you'll use every day:
| Tab | What it's for |
|---|---|
| Home | Your daily snapshot — what's due, what's coming up, latest announcements |
| Courses | Every course you're enrolled in |
| Calendar | Your class schedule, events, and assessment due dates |
| Notifications | A running feed of everything the app has notified you about |
Getting Started
2.1 Installing the app
You'll need an Android device running Android 8.0 (Oreo) or later (Android 10 or newer is recommended for the best experience), your school Microsoft account (email + password), and an internet connection for the first sign-in.
- Download LCC from the Google Play Store on your Android device. If you are unable to find the app in the store, you can directly access it by clicking here.
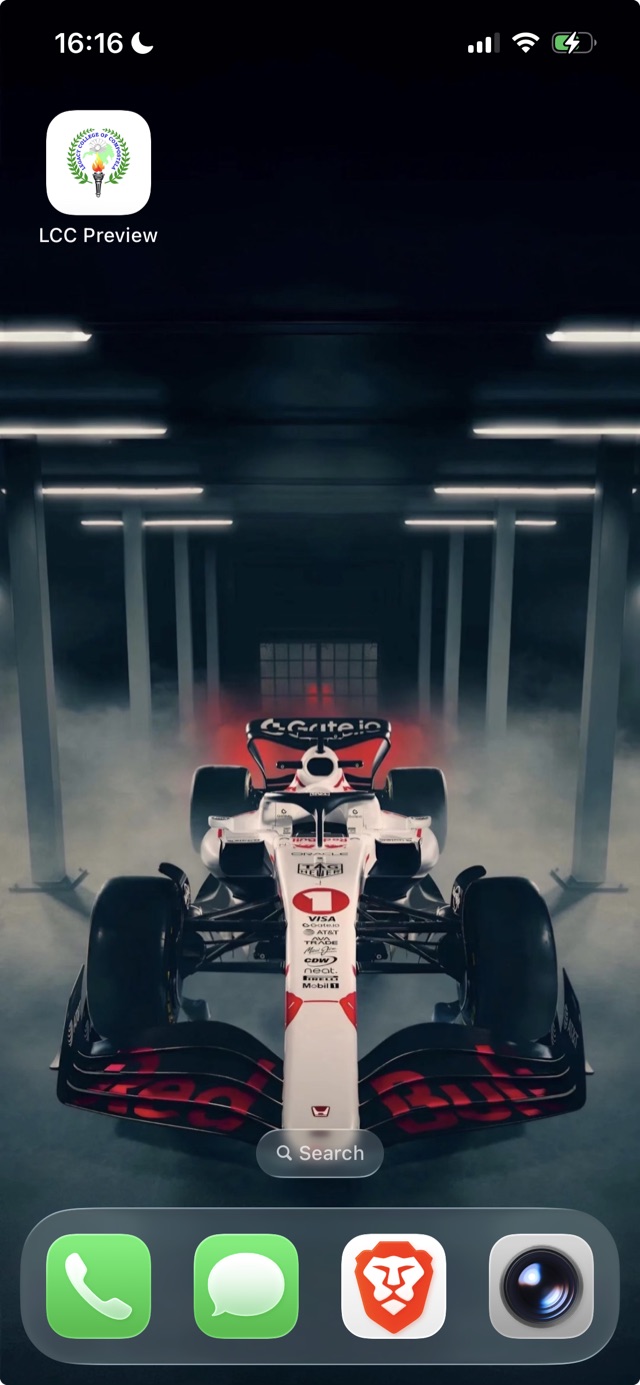
- Once installed, tap the ClassEdge icon on your home screen to open it.
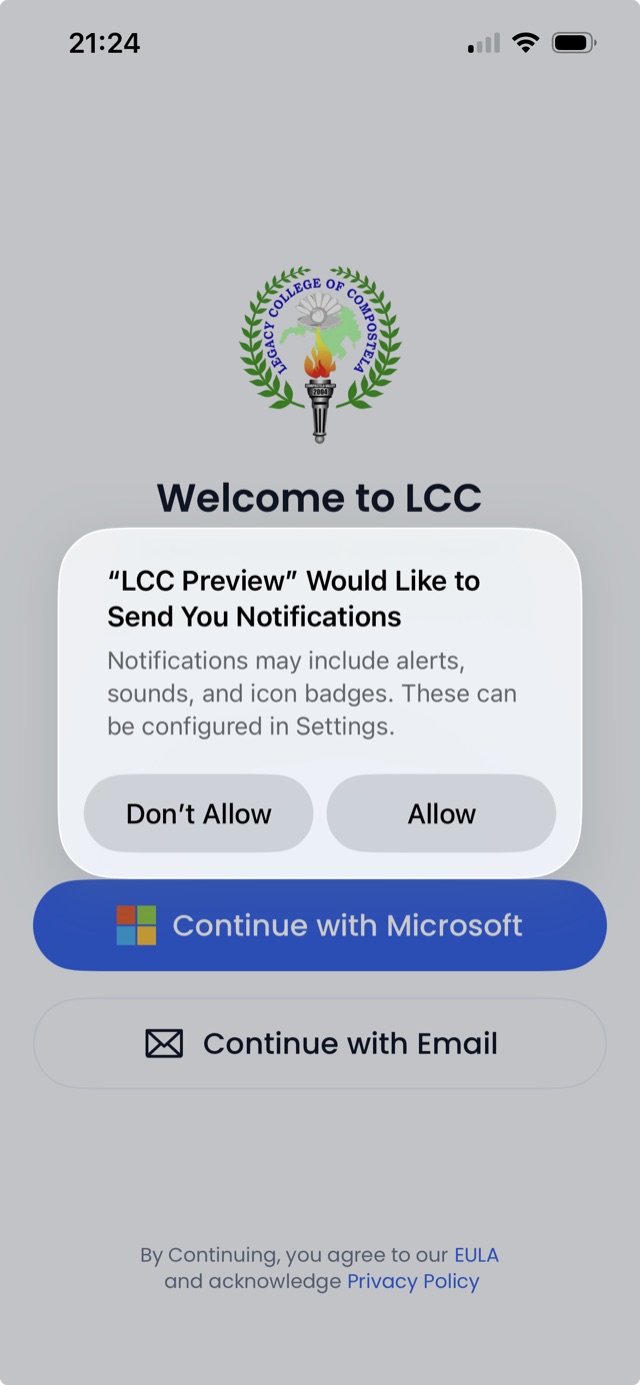
Allow push notifications when prompted
The very first time you open ClassEdge after installing it, Android will show a permission prompt asking whether ClassEdge can send you notifications. Tap Allow.
This is how you'll get alerts for new announcements, upcoming events, and assessment reminders. If you tap Don't allow, you won't miss anything inside the app, but you won't get lock-screen notifications either — you'll have to open ClassEdge to see what's new. You can change your mind later from your phone's Settings → Apps → ClassEdge → Notifications.
2.2 Logging in with your school Microsoft account
When you first open the app, you'll land on the login screen. It shows your school's logo, a welcome message, and a Continue with Microsoft button.
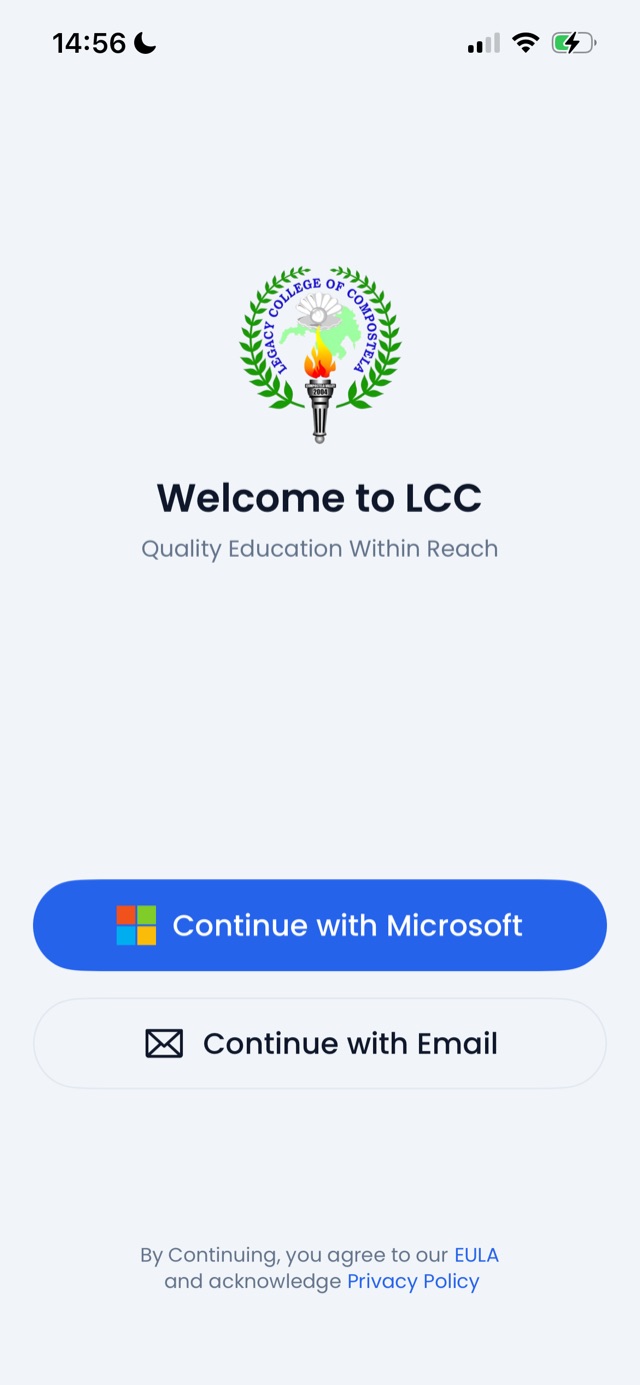
To log in:
- Tap Continue with Microsoft. A Microsoft sign-in page opens.
- Enter your school email address (the one your school gave you) and tap Next.
- Enter your school password and tap Sign In.
- Complete the two-factor authentication (2FA) step — this is required for every login. Approve the sign-in from your authenticator app, or enter the code sent by SMS or phone call.
- Microsoft will ask permission to share your account info with ClassEdge — tap Accept.
- You'll be redirected back to the app, and you're in.
If you don't know your school email or password, contact your school's IT support. ClassEdge doesn't create student accounts — they come from your school.
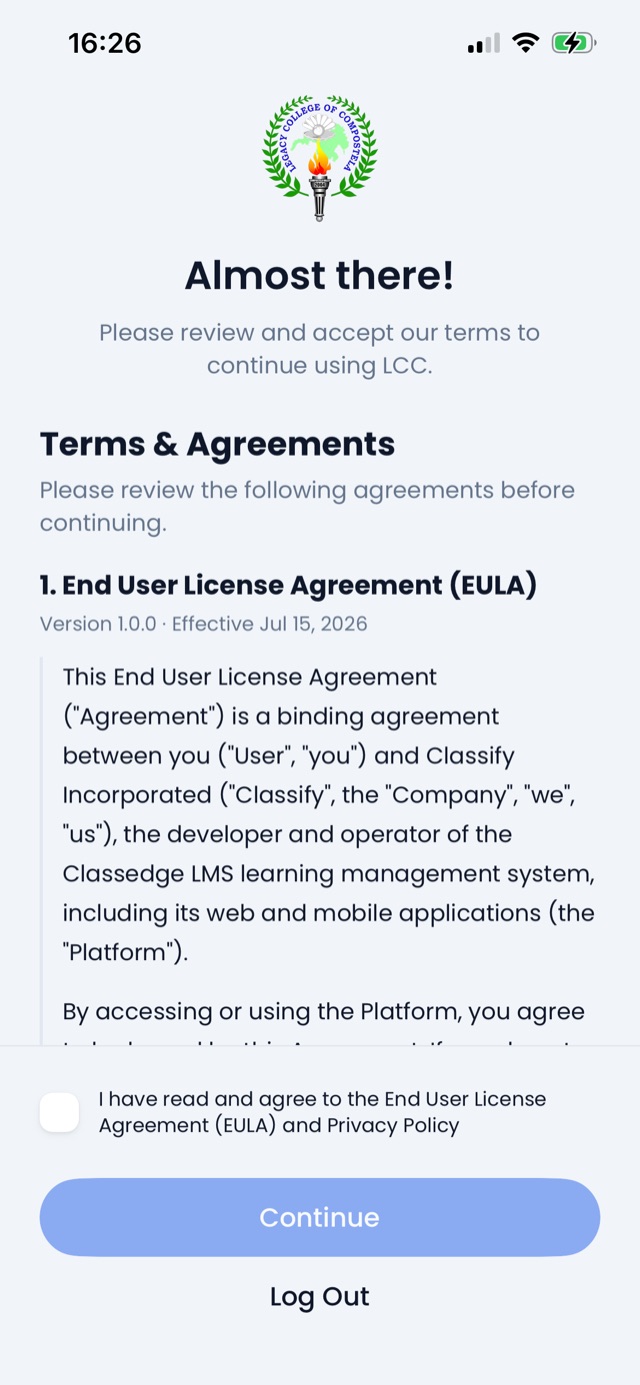
2.3 First-time users: EULA and Privacy Policy
Below the login button, you'll see this small line of text:
"By Continuing, you agree to our EULA and acknowledge Privacy Policy"
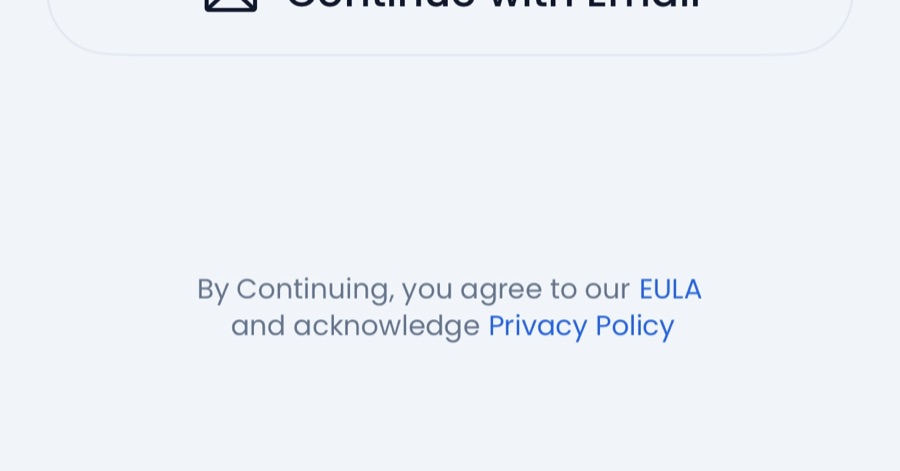
The first time you use ClassEdge, please tap each link and read them:
- EULA (End-User License Agreement) — the rules for using the app.
- Privacy Policy — what data ClassEdge collects and how it's used.
By tapping Continue with Microsoft, you're confirming that you've read and agreed to both. If you'd rather not agree, don't tap Continue — you can close the app instead. If you've already signed in and decide you no longer agree, you can sign out from the app at any time (see 2.4 Signing out).
2.4 Signing out
There are two ways to log out of ClassEdge.
Option A — Quick log out from the avatar sheet
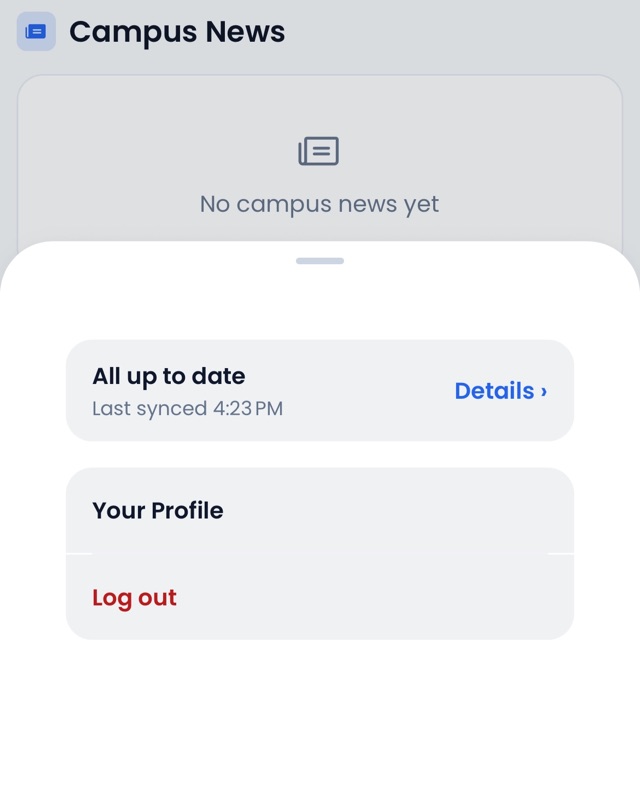
- Tap your avatar at the top-right of any tab.
- A bottom sheet slides up. Under the Account section, tap Log out (shown in red).
- A confirmation dialog appears titled Confirm Logout, warning you that all local data will be cleared and the action can't be undone.
- Tap Yes, Log me out to confirm. (Tap No, Cancel if you change your mind.)
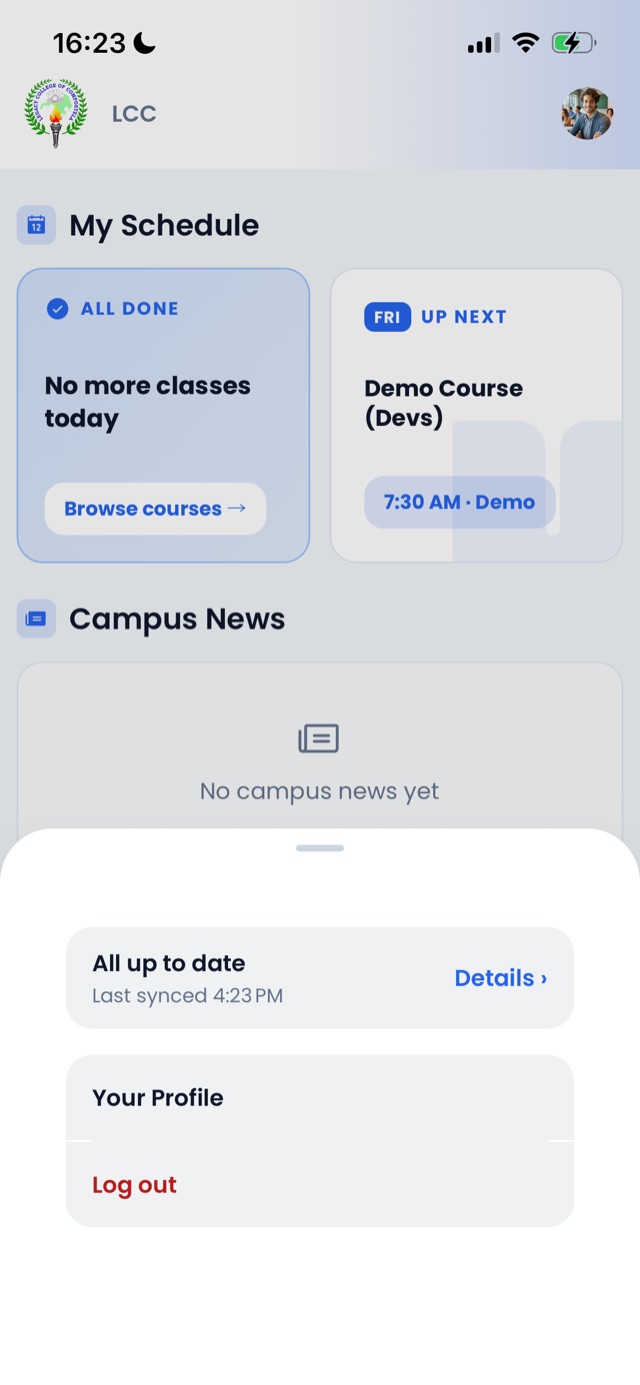
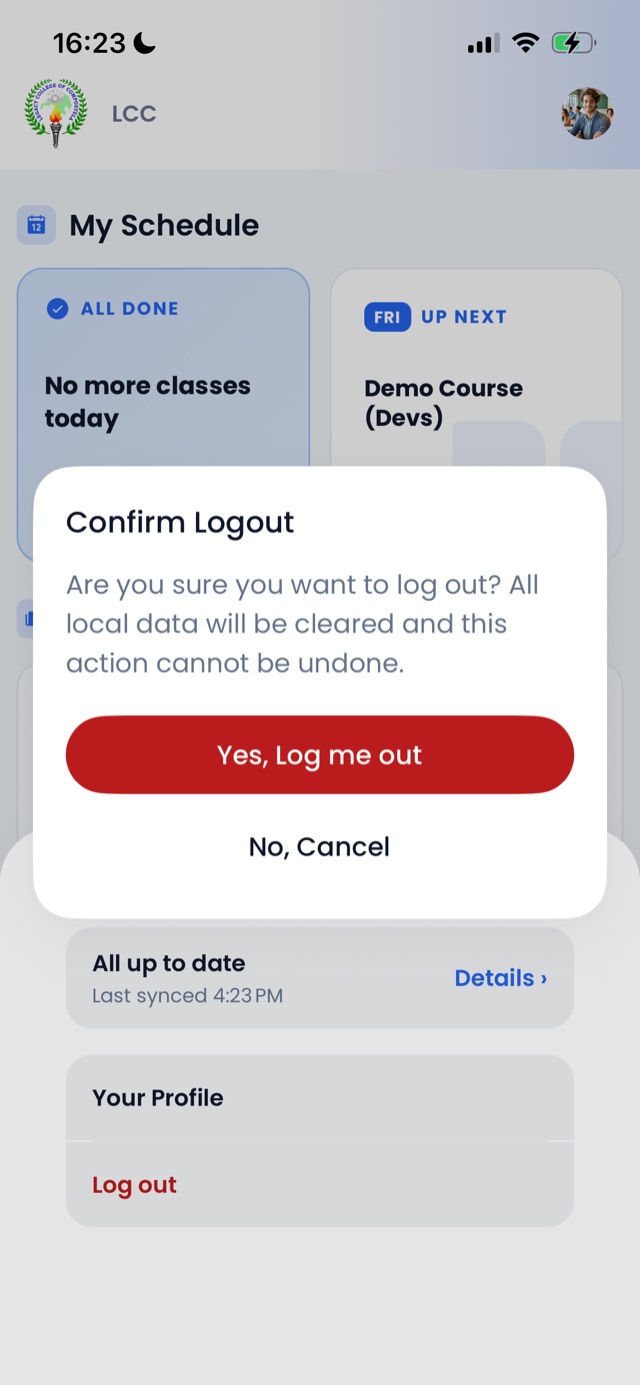
Option B — Log out from your Profile screen
- Tap your avatar at the top-right of any tab.
- In the bottom sheet, tap Your Profile.
- On the Profile screen, scroll down to the bottom and tap Log out.
- The same Confirm Logout dialog appears.
- Tap Yes, Log me out to confirm.
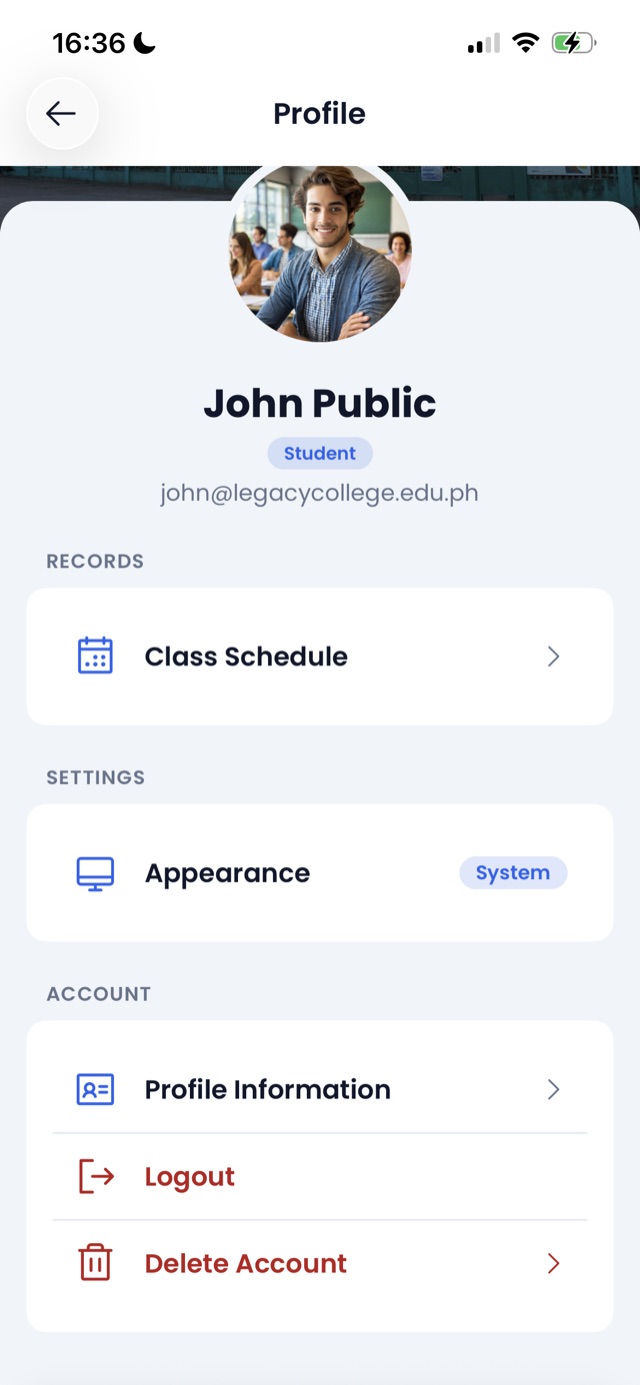
Either way, you'll be returned to the login screen.
If you have unsynced changes when you tap Log out, the dialog will show a warning telling you how many changes will be lost. Make sure everything is synced first (see Working Offline) if you don't want to lose them.
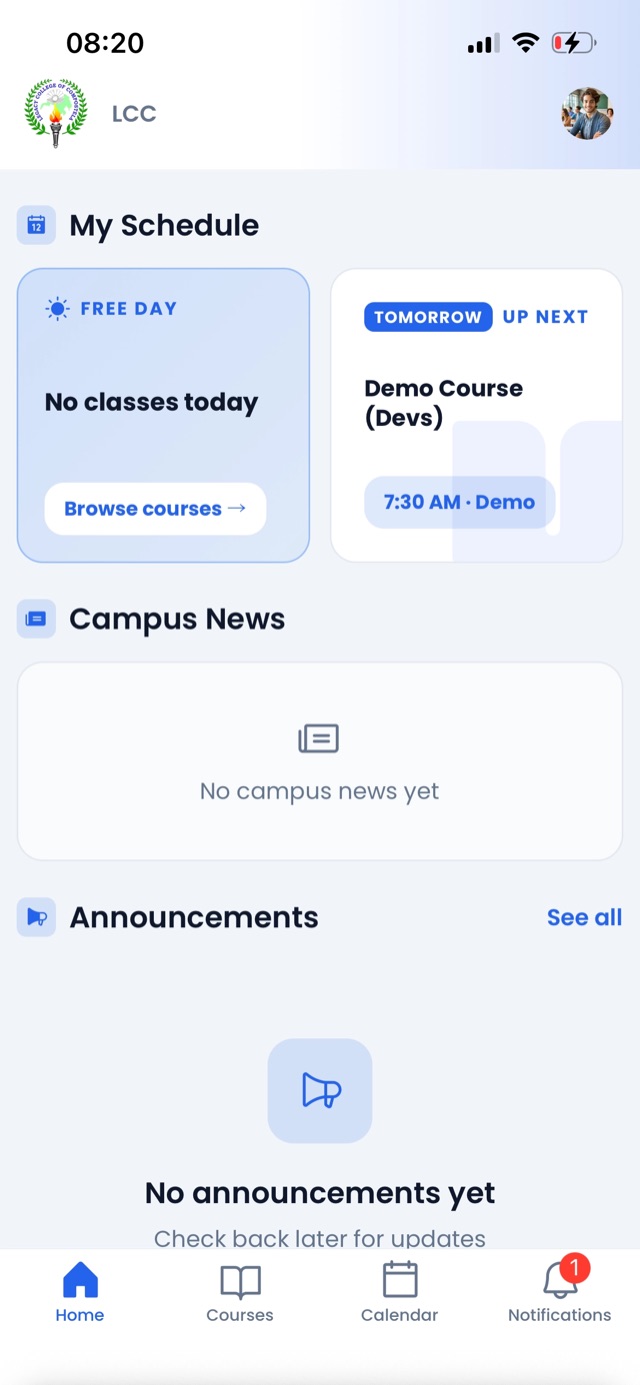
Your Home Screen
From top to bottom, you'll see:
- Schedule — your class blocks for the day
- Campus News — the latest news card from your school
- Announcements — a preview of the most recent announcements. Tap See all to open the full list.
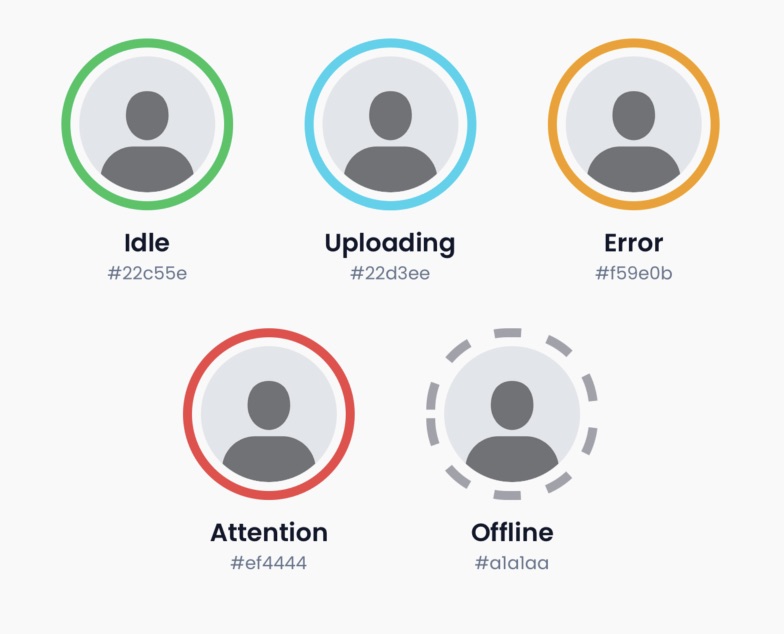
Sync status on your avatar
Sync status is shown as a colored ring around your avatar at the top-right of the screen. The color tells you what's happening:
Tap your avatar to open the account sheet. The top card summarizes the current state (e.g. "All up to date", "Syncing 3 items…", "2 things need your attention") and shows when the app last finished syncing. Tap Details › to open the full Sync Center where you can review and retry stuck items.
Courses Tab
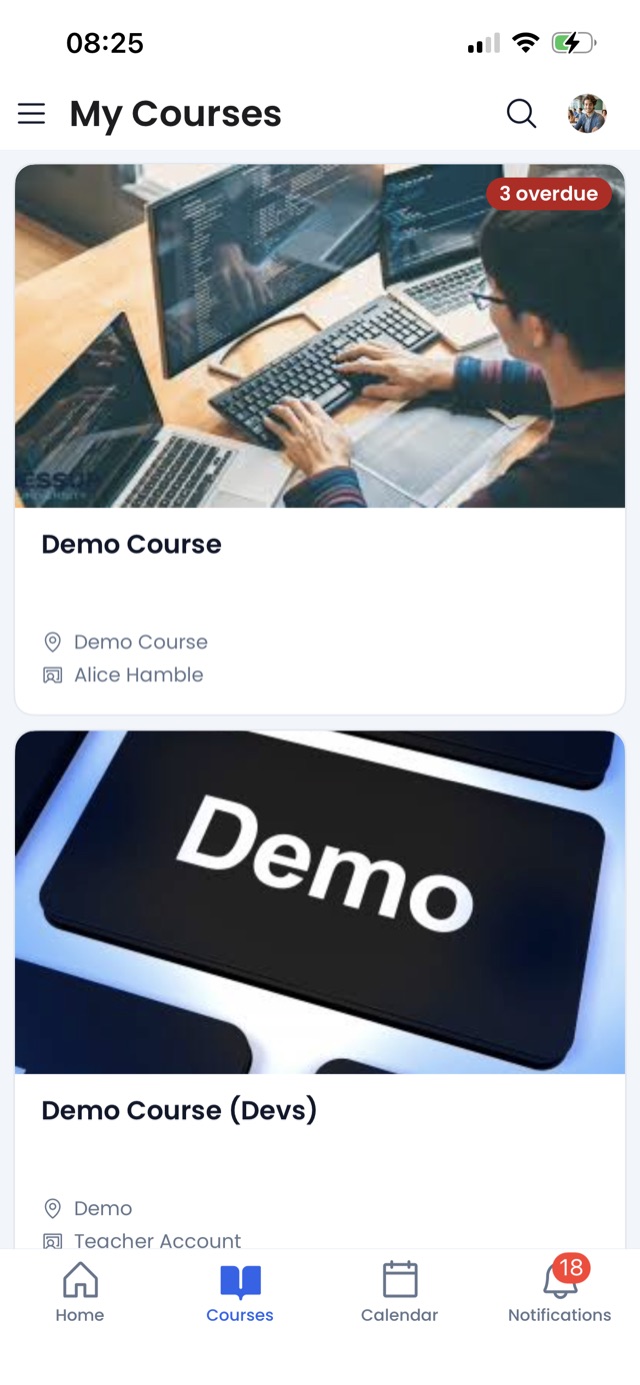
The Courses tab lists every course you're enrolled in for the current semester.
Course list
Each course card shows, from top to bottom:
- Subject photo — a banner image for the course
- Course name
- Teacher name
- Schedule — when the class next meets (e.g. "Now · 9:00 – 10:00", "Today · 9:00 – 10:00", or "Next: Mon · 9:00")
Tap any course card to open it.
Inside a course
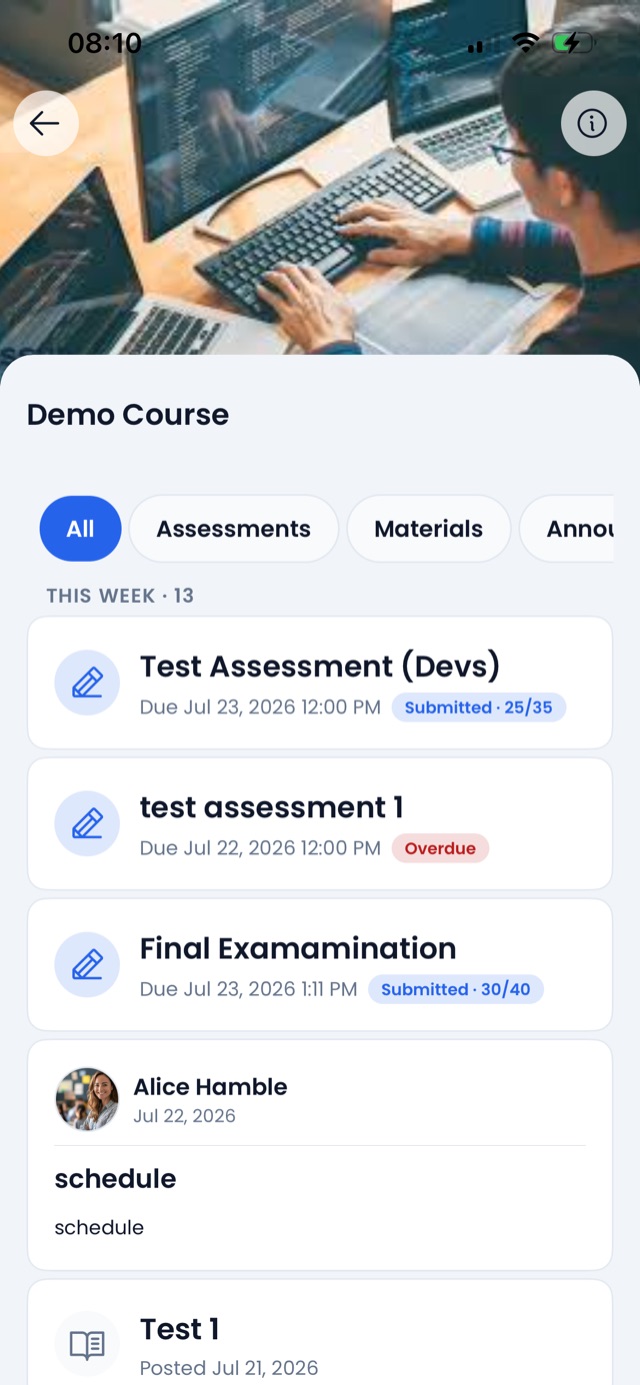
When you tap a course card, you'll land on the course screen. From top to bottom:
- Subject photo — a large banner image for the course. Pull down to see a stretchy refresh effect.
- Back button (top-left, floating) — returns you to the Courses list.
- Info button ⓘ (top-right, floating) — opens the full Course Details page (see below).
- Subject name and subject type, just below the photo.
- Timeline — a chronological feed of everything happening in this course.
The timeline
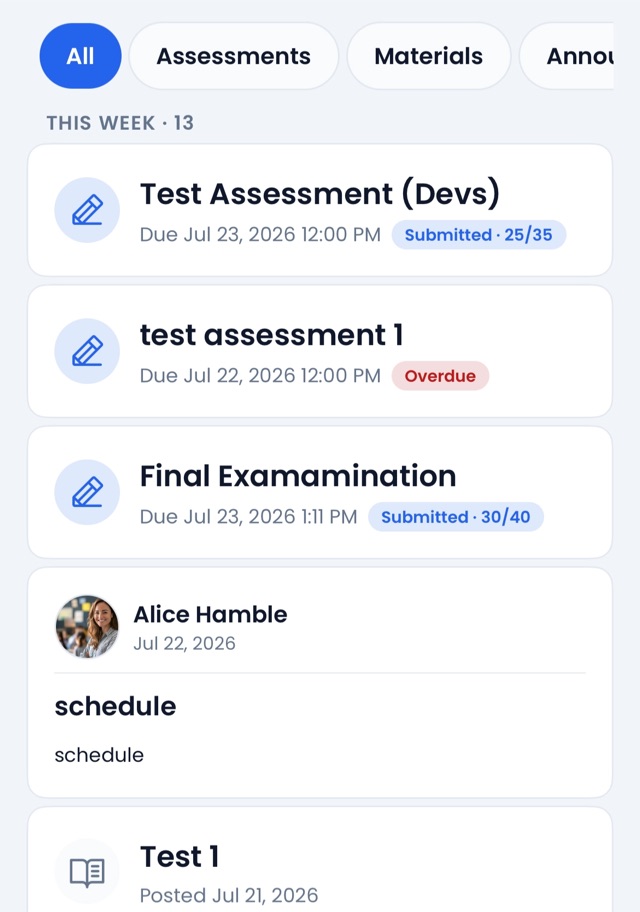
The timeline groups items into time buckets (like Today, Upcoming, Past) so the most relevant content is easy to find.
At the top of the timeline you'll see filter chips. Tap one to narrow the list to a single type:
- All — everything (default)
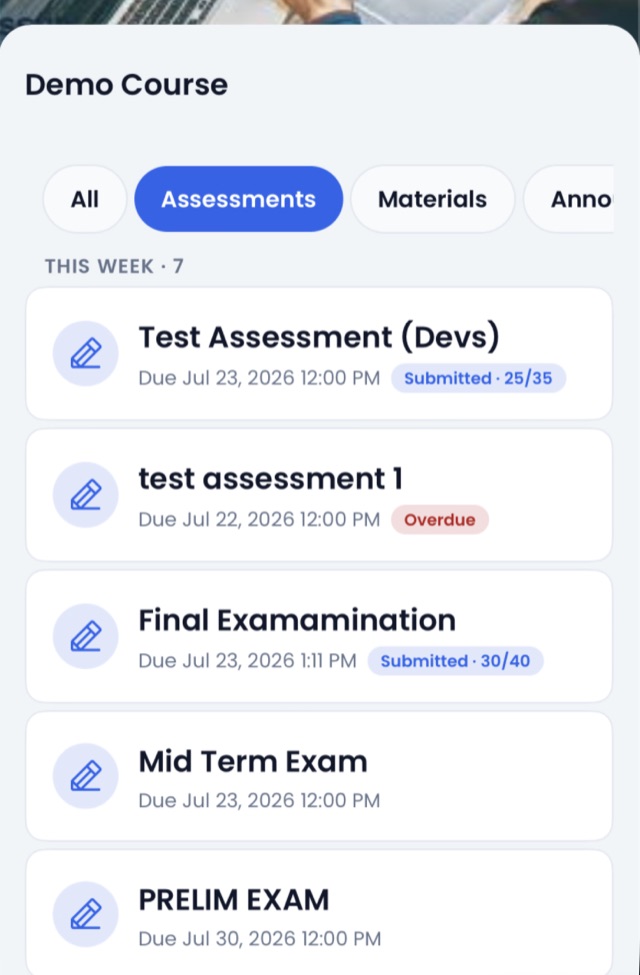
- Assessments — quizzes, exams, and assignments (see chapter 5)
- Materials — lesson slides, PDFs, videos, and other resources your teacher has uploaded
- Announcements — messages posted just for this course
- Attendance — your attendance records for the course's class sessions
Tap any item in the timeline to open its full details. If your filter shows nothing, tap Show all to reset it.
The Course Details page
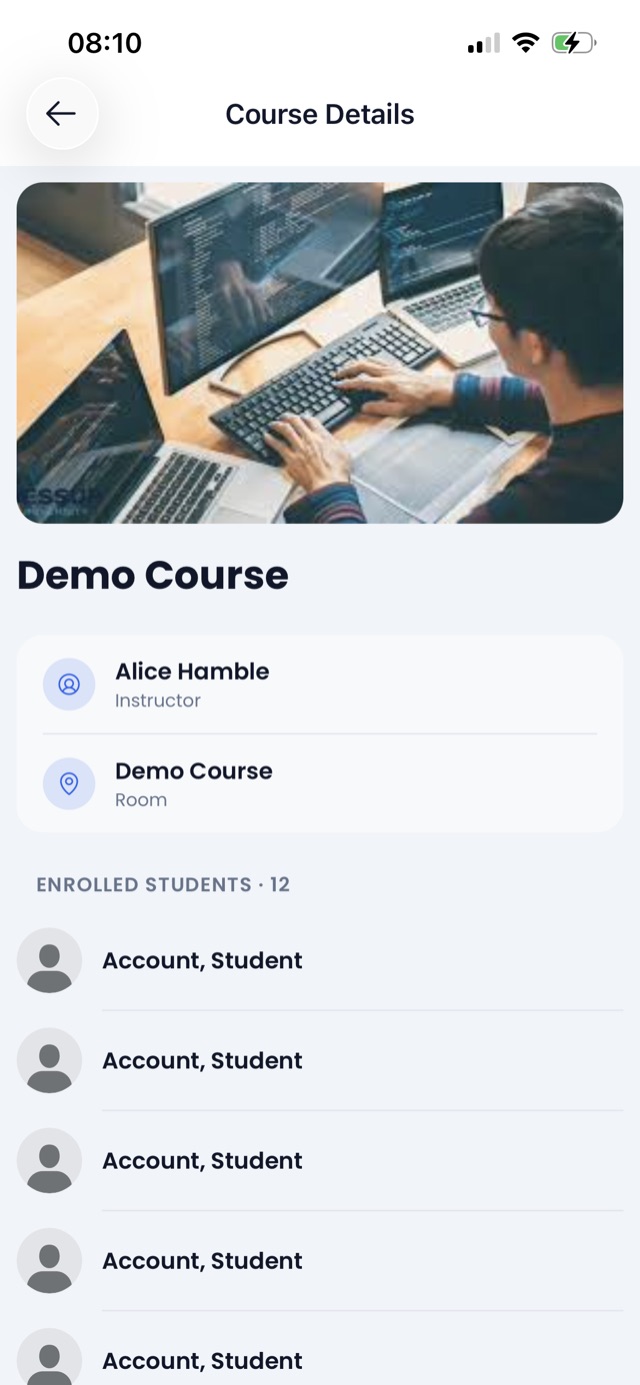
Tap the ⓘ icon at the top-right of the course screen to open the Course Details page. This is where the general info about the course lives — description, schedule, instructor info, and other reference details.
The Orbit Program menu
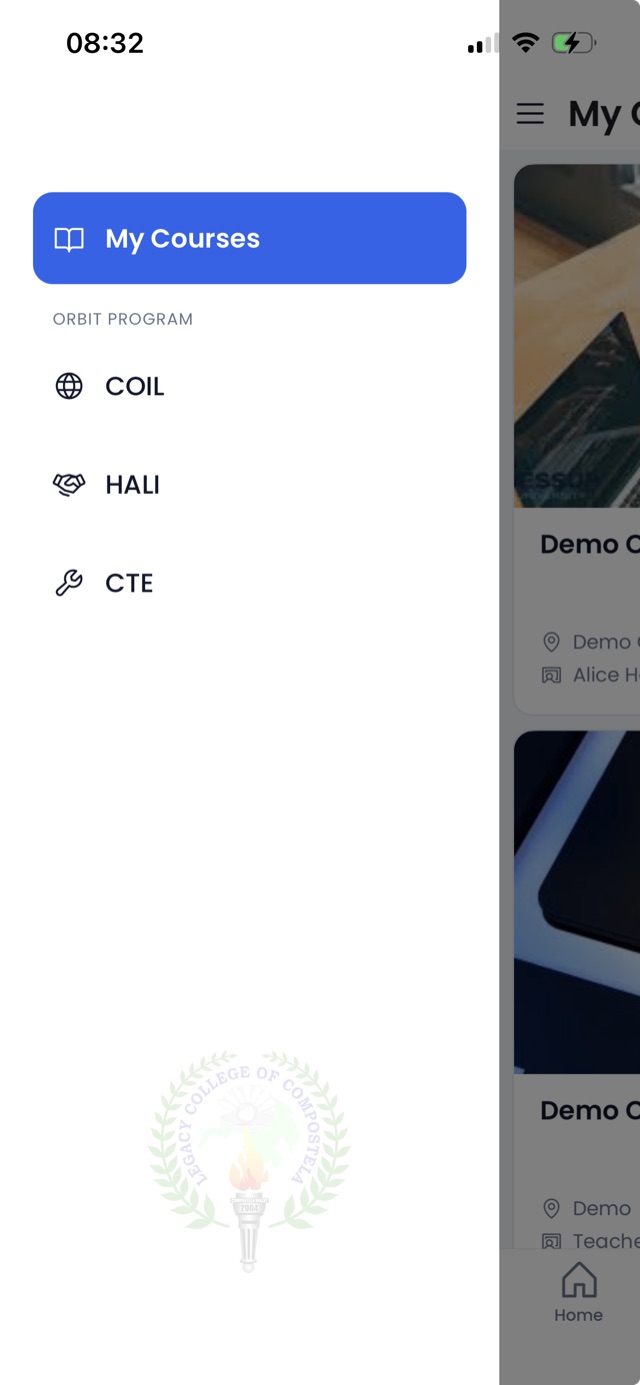
Open the drawer (☰) to switch between:
- My Courses — your regular semester courses
- COIL
- HALI
- CTE
If your school participates in any of these programs, tap the relevant item to see courses tagged for that program. Ask your school for details on what each program covers and whether you're eligible.
Assessments
Assessments are quizzes, exams, and assignments your teachers post inside a course.
5.1 Finding an assessment
There are two ways to reach an assessment:
- From your Course — open the Courses tab → tap a course → on the course timeline, tap the Assessments filter chip → tap the one you want.
- From Notifications — open the Notifications tab and tap the notification for a newly posted assessment.
5.2 The assessment page
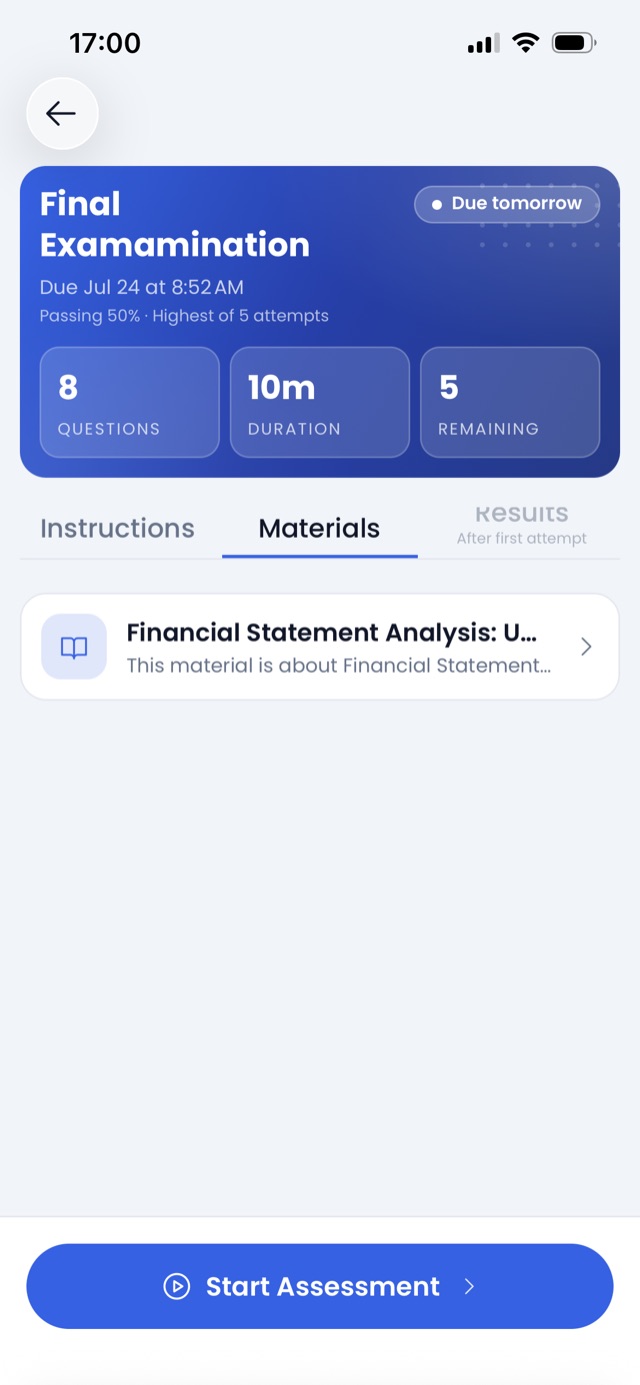
When you open an assessment, you land on its details page. The page has three tabs:
- Instructions — what the assessment is about, how to answer, and any notes from your teacher
- Materials — supplemental files (readings, references, etc.) your teacher attached
- Results — your past attempts and score, once you've submitted at least one
At the top of the page you'll find a hero card with the essentials at a glance:
- Title and description
- The available window (when the assessment opens and closes)
- Number of questions and the time limit
- Whether late submissions are allowed, and how many days are left in the grace period
- Whether your score will be shown after submission
- How many retakes you have left
5.3 The bottom banner (start / resume)
At the bottom of the assessment page is a sticky action banner that always tells you what you can do right now. Its look and label change based on your situation:
Actionable banners
- ▶ Start Assessment — a large blue button. You're ready to begin your first (or next) attempt. Tap it to open the attempt screen. While it's launching the button dims to "Starting…".
- ↻ Resume Attempt — a large blue button with a refresh icon. You have an attempt already in progress. Tap to jump straight back into it — the timer picks up where you left off.
Extra chips above the Start button
Depending on the state of the assessment, one or both of these chips may appear right above the Start button:
- ⚠ Past due · closes in N days (red) — you're within the late-submission grace period. The Start button also turns amber to make sure you notice you're starting late. If late submissions are allowed with no bounded grace period, the chip reads "Past due · submissions count as late" instead.
- ⏰ Only N min — assessment closes soon (amber) — less time is left on the assessment's window than its normal time limit, so your attempt's timer will be capped to whatever's left before the hard close.
Informational banners (no button)
Some situations don't let you start a new attempt. In those cases the banner shows a muted card with a small icon and a message instead of a button:
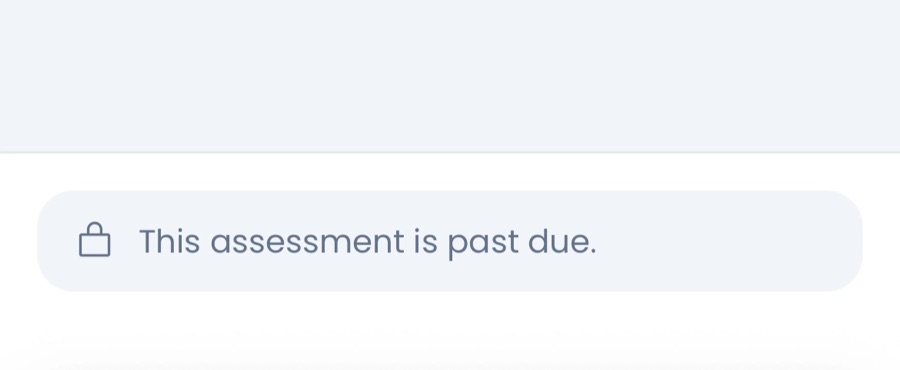
- 🔒 This assessment is past due. — the end time has passed and no late grace remains.
- ⏰ Not enough time to start a new attempt. — less than one minute is left on the assessment's window; there's not enough time to give you a fair attempt.
- ✓ All attempts used · N of N — you've used every retake your teacher allowed.
Loading state
- ⏳ Preparing… — a muted grey pill while the app is still loading your attempt info. It'll swap to one of the banners above once ready.
5.4 Taking an attempt
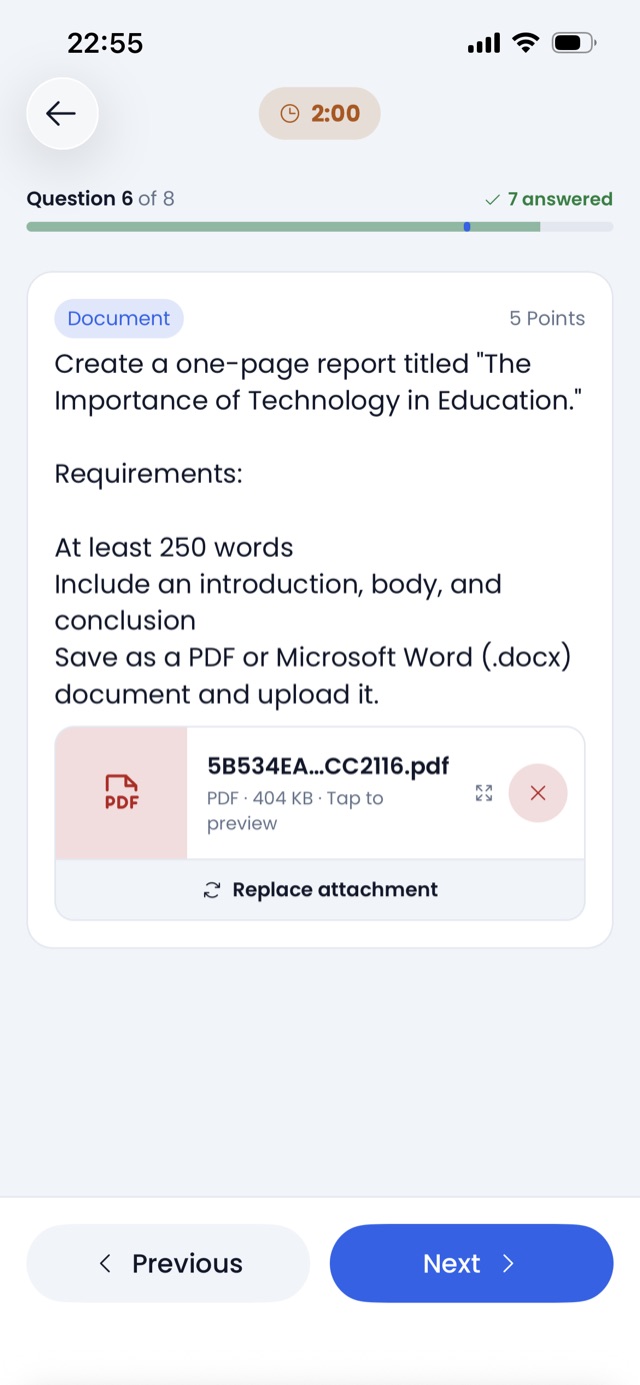
Once you tap Start (or Resume), you enter the attempt screen. It shows one question at a time.
- Answer the question using the input for its type (see Question types below).
- Move between questions using the on-screen navigation.
- Your answers are saved as you go, so if the app crashes or you lose connection, you can reopen the attempt and continue where you left off.
The step-by-step process
Here's the full flow from open to submit:
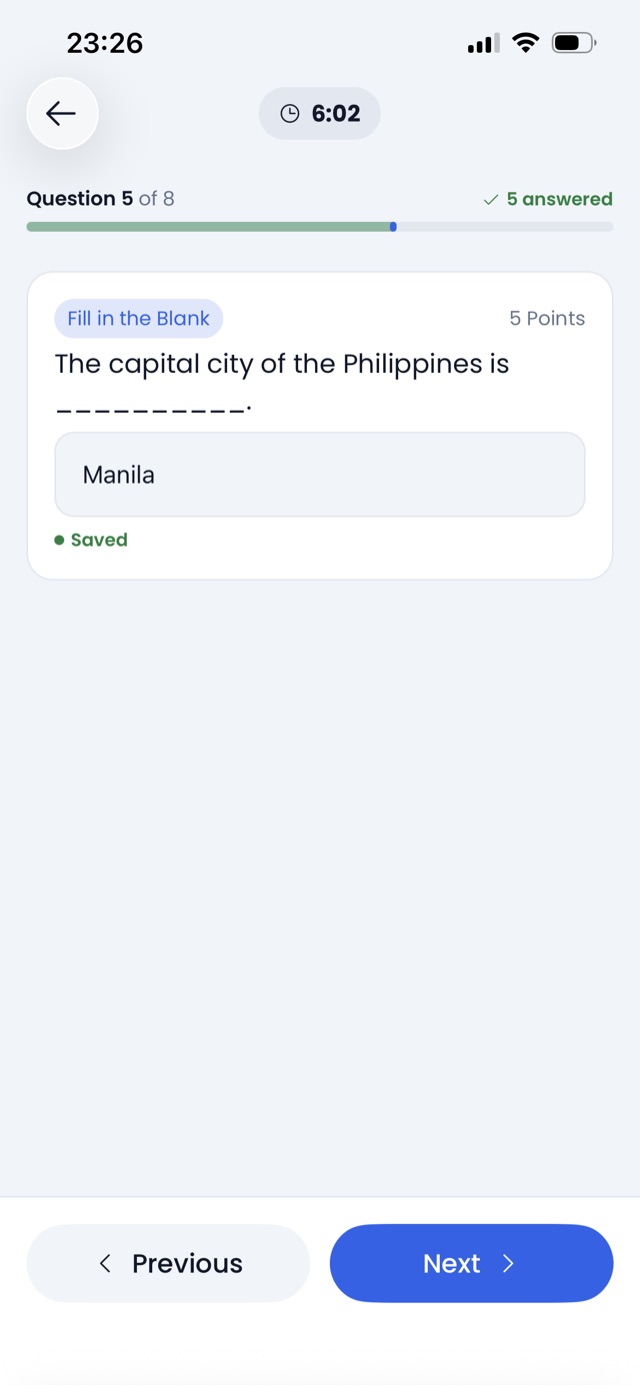
- Read the question card. Note the point value (top-right) and the type (top-left).
- Open any Reference file if the teacher attached one — you may need it to answer.
- Enter your answer using the input for that question type.
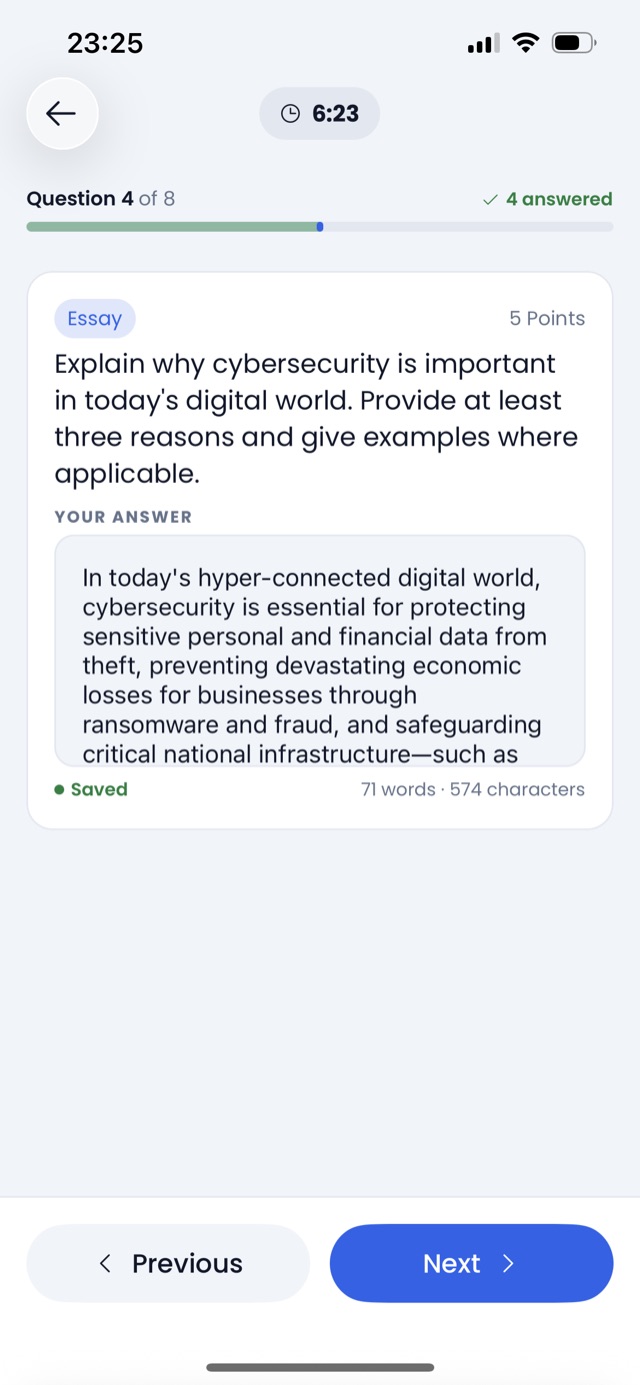
- Watch for the "Saved" indicator on text answers — it confirms your keystrokes have been captured before you move on.
- Tap Next at the bottom to move to the next question. If you want to change an earlier answer, tap Previous.
- Keep an eye on the progress bar and timer at the top so you know where you are and how much time is left.
- On the last question, the primary button changes to Submit · N/M (where N/M is your answered-out-of-total count).
- Tap Submit — a confirmation dialog appears summarizing your progress.
- Confirm to send your answers. Once you confirm, you can't change your answers.
- You'll be taken back to the assessment page, where the Results tab opens automatically.
The progress bar
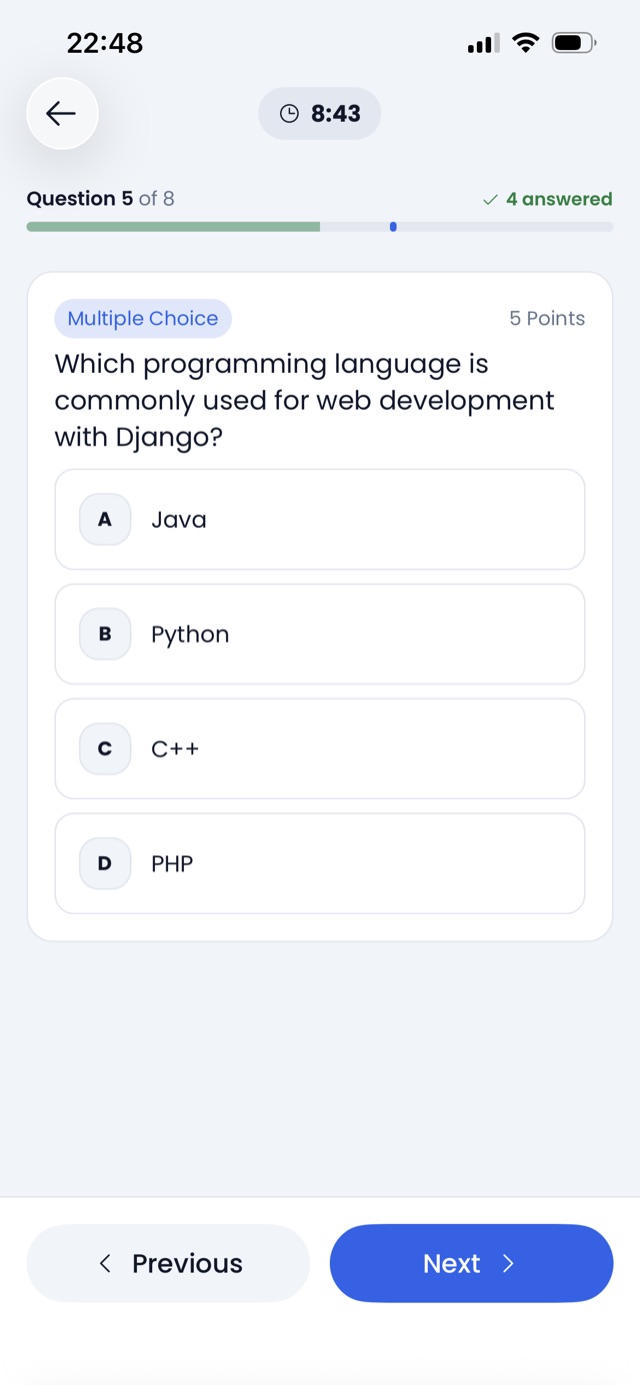
Pinned at the top of the attempt screen, the progress bar answers two questions at once: "where am I?" and "how much have I actually finished?"
What the labels say:
- "Question X of Y" on the left — the number of the question you're looking at right now. "Question 4 of 10" means you're currently viewing the 4th question in a 10-question assessment.
- "N answered" on the right, with a green ✓ icon — how many questions you've provided an answer for. A question counts as answered when it has either non-empty text or an uploaded file for image-upload questions.
What the track shows: the thin bar underneath the labels has two overlaid indicators that move independently:
- A soft green fill stretching from the left edge. Its width is the share of questions you've answered — for "3 answered · 10 total" it fills the leftmost 30% of the track.
- A short blue vertical tick floating on top of the track. Its position is where you are right now — for "Question 4 of 10" it sits at the 40% mark.
Why they're separated: because "where I am" and "what I've finished" are different questions. You might:
- Be ahead of your answered count — skimming forward without answering (tick is past the green fill, so a gap of unfilled track shows between them).
- Be behind your answered count — you went back to review or edit an earlier answer (the tick sits inside the green fill; the fill doesn't shrink just because you scrolled back).
- Be exactly on the boundary — the tick sits right at the edge of the green fill, meaning you've answered everything up to and including the last question you're on.
So "Question 4 of 10 · 3 answered" with the tick at the 40% mark and the green fill only reaching 30% tells you at a glance: "I'm on question 4, but I haven't answered it yet — I've completed 1, 2, and 3."
The question card
Every question has the same layout on top:
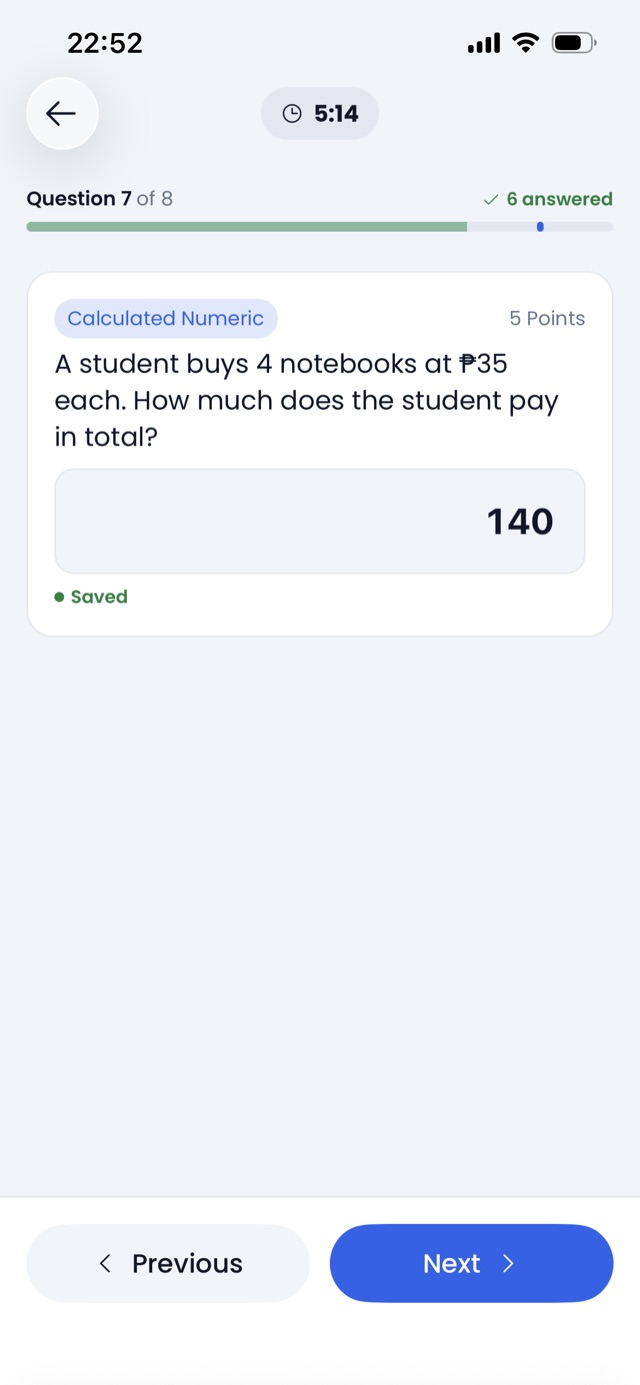
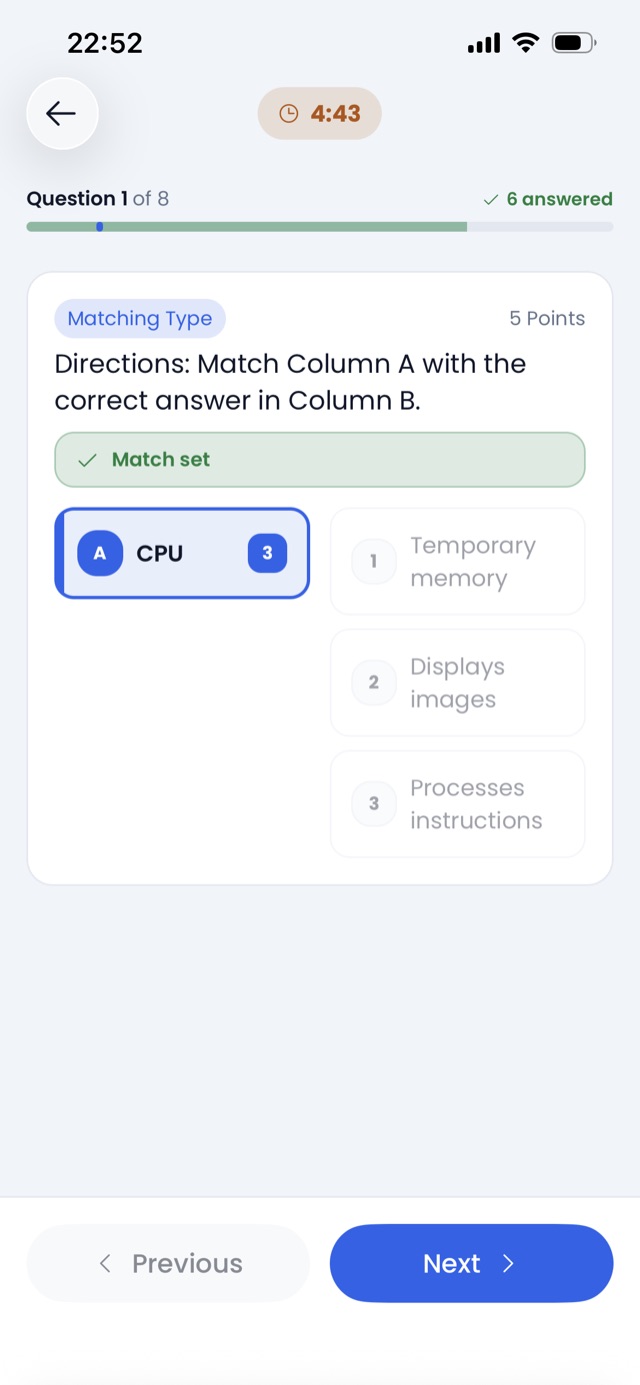
- A small type pill in the top-left corner (e.g. "Multiple Choice", "Essay") — so you always know what kind of answer is expected.
- The point value in the top-right (e.g. "5 Points").
- The question text below.
- An optional Reference file attachment — tap it to open (a PDF, image, or other file your teacher wants you to consult while answering).
- Then the input area for the specific question type.
For text-input types (essay, fill-in-the-blank, numeric), a small Saved indicator appears under the input to confirm your latest keystrokes have been recorded.
Question types you might see
The exact set depends on how your teacher built the assessment. Here's how to answer each type:
| Type | How to answer |
|---|---|
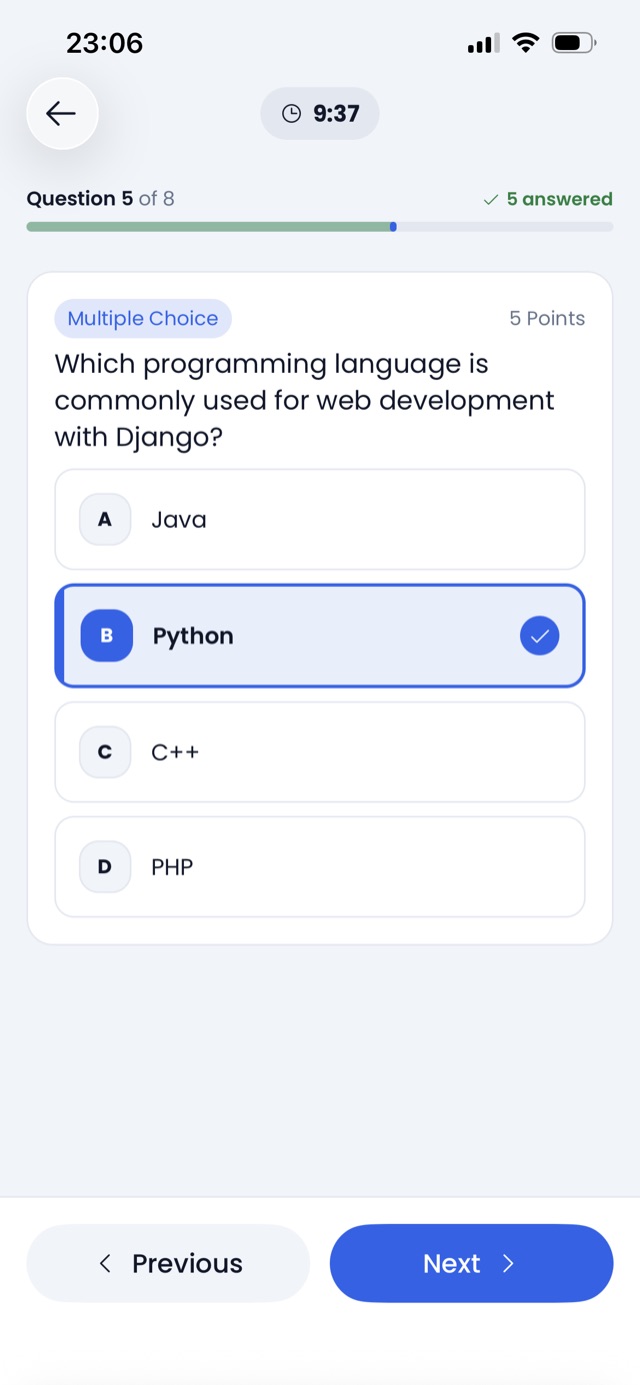
| Multiple choice | Tap one of the answer options. Options are labeled A, B, C, … and can contain text, an image, or both. The selected option gets a blue accent border and a light tint. Tap a different option to change your answer at any time before submitting. |
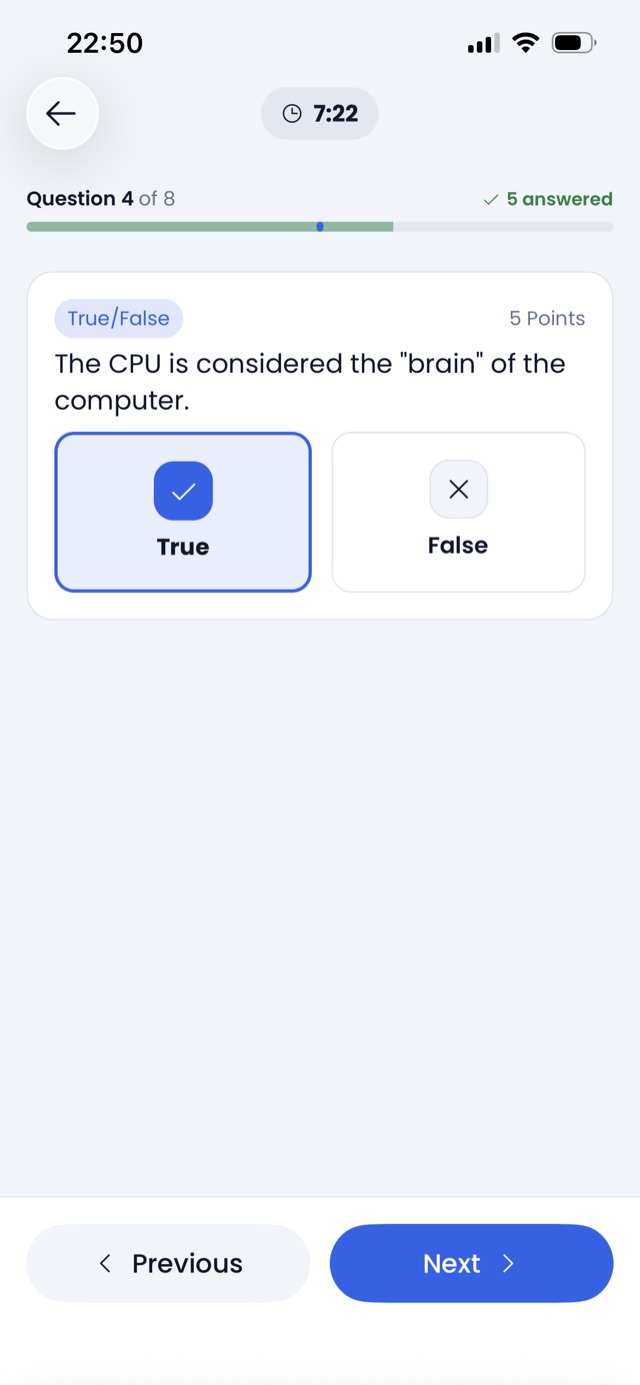
| True / False | Tap the True (✓) or False (✗) card. Only one can be selected. Tap the other to switch. |
| Fill in the blank | Tap the text box and type your answer. Keep it short — this is meant for a word or short phrase. Any leading/trailing spaces are trimmed automatically when you tap away. |
| Essay | Tap the large text box and type a longer response. You'll see a word and character count under the box (e.g. "42 words · 250 characters") so you can gauge your length. There's no hard limit unless your teacher specifies one in the question text. |
| Numeric | A big right-aligned input opens the number keypad. Type your answer — only digits, one decimal point, and an optional leading minus sign are accepted. Non-numeric characters are stripped automatically. |
| Matching type | Two columns of items appear. Tap an item on the left (it highlights), then tap the matching item on the right — the two link into a pair. Only one pair is stored at a time in this question type; pairing a different left item replaces your answer. |
| Image / document upload | Attach an image or PDF (max 25 MB). Tap the upload button and pick a source: Camera (requires camera permission), Photo library (requires photo permission), or File. Once uploaded, tap the file to preview it, or re-open the picker to replace it. If your file is too big or the wrong format, a red error message appears — pick a different file. |
Moving between questions
At the bottom of the attempt screen you'll see two navigation buttons:
- ← Previous — go back to the question before this one. Disabled on the first question.
- Next → — go forward to the next question. On the last question, this button changes into Submit · N/M (where N is the number you've answered and M is the total).
You can revisit and change any answer as many times as you want until you tap Submit and confirm.
The timer
If the assessment has a time limit, a countdown pill shows in the header. It changes appearance as time runs out:
- Neutral — plenty of time left
- Amber (5 minutes or less) — start wrapping up
- Red, pulsing (less than 1 minute) — you're almost out of time
- Solid red, locked — time's up
When the timer hits zero, the app auto-submits for you.
Leaving mid-attempt
If you tap the back button (or your device's back gesture) during an attempt, a dialog appears:
You can come back, but the clock won't pause.
⚠ Timer keeps running — any time away counts against your remaining minutes.
[ Leave anyway ] [ Keep going ]
Tap Keep going to stay, or Leave anyway to exit. Nothing you've answered is lost either way, but the countdown doesn't stop.
Submitting
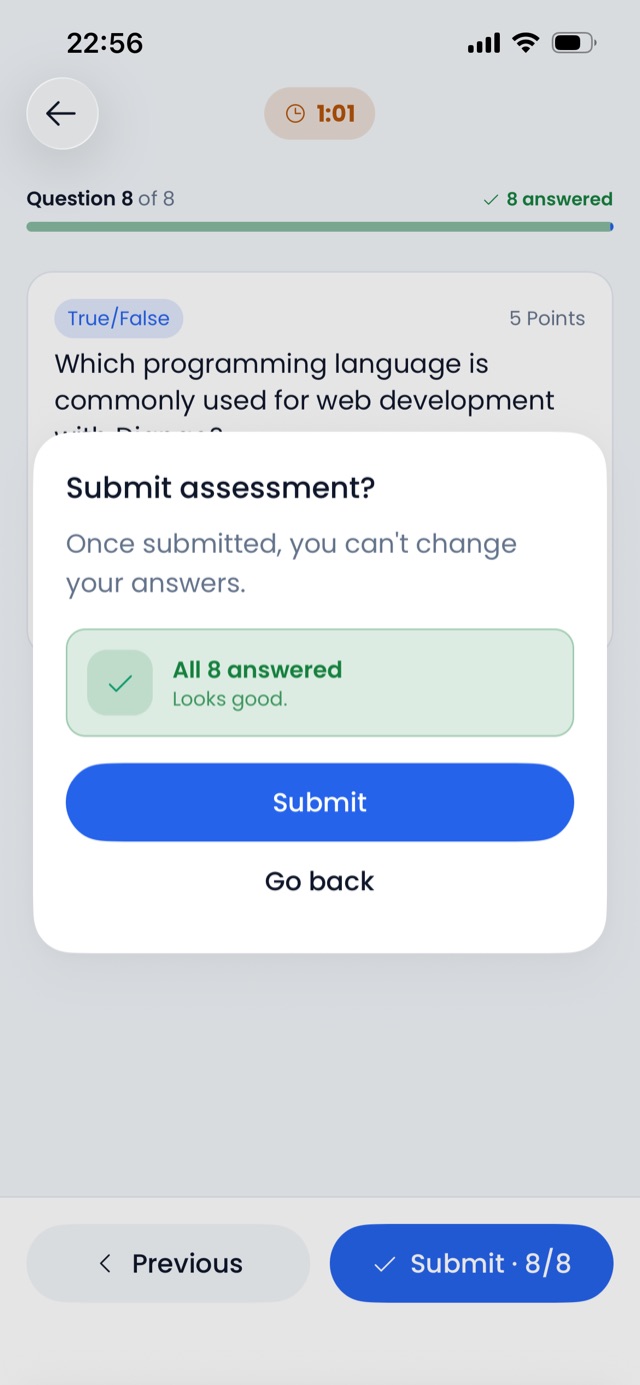
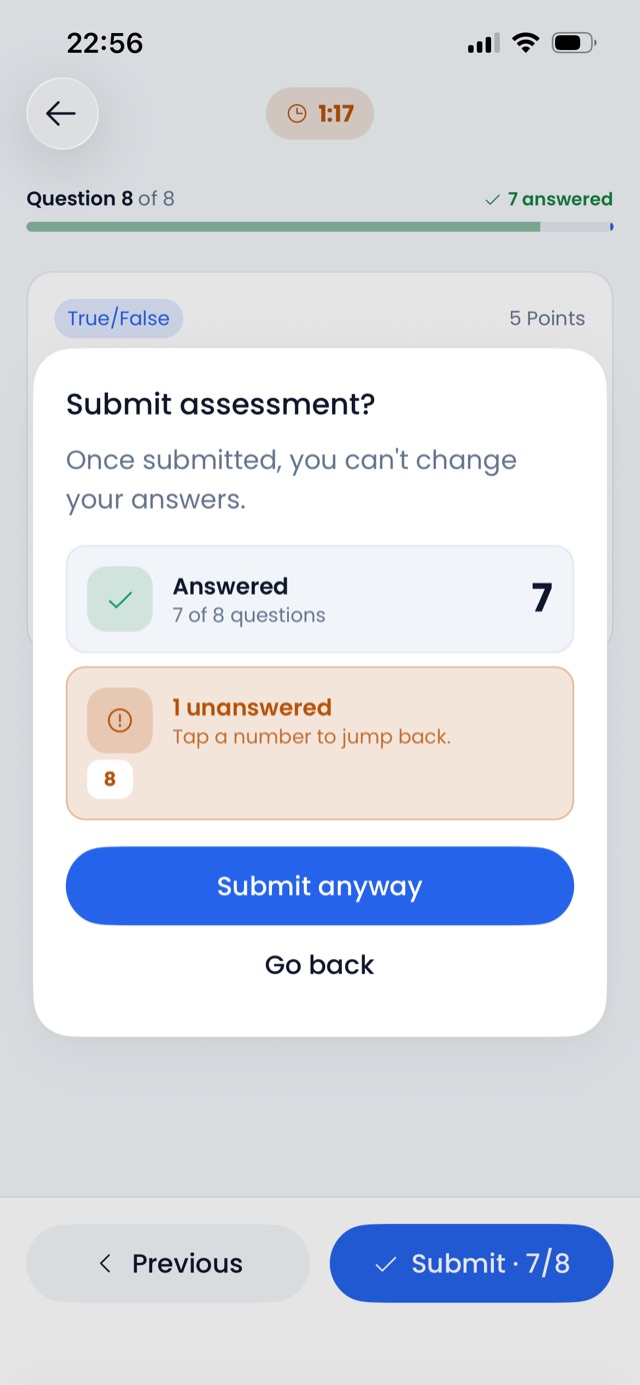
Tap Submit · N/M on the last question to open the confirmation dialog. What you see next depends on your progress:
- All questions answered — a green "All N answered · Looks good." banner and a single Submit button.
- Some questions unanswered — the dialog shows two cards:
- Answered — how many out of the total you've completed, with a big number
- ⚠ N unanswered · Tap a number to jump back — chips for each unanswered question (1, 2, 5, …). Tap any chip to close the dialog and jump straight to that question. The confirm button becomes Submit anyway if you want to send it in as-is.
Either way, tap Go back to close the dialog without submitting. Once you confirm, the app sends your answers, closes the attempt, and takes you back to the assessment page with the Results tab open.
If the timer runs out mid-attempt, a red banner appears at the top — "Time is up! Submitting..." — and the app submits automatically. You don't need to do anything.
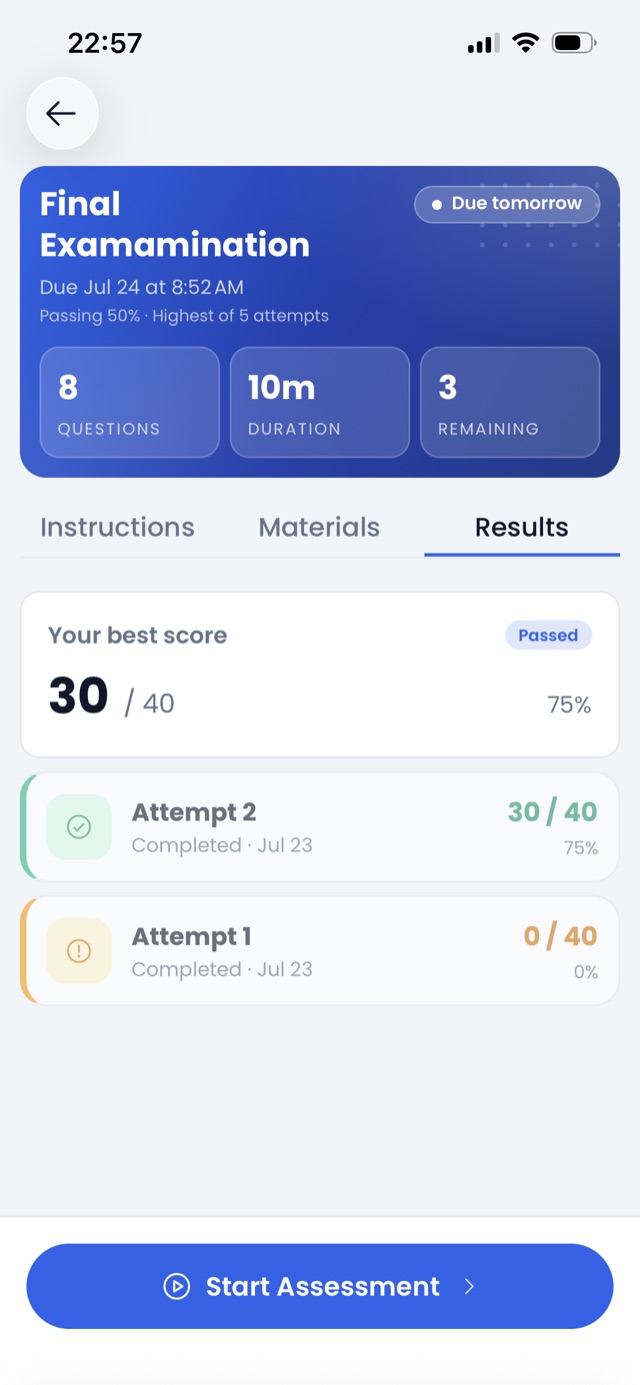
5.5 Your results
After you submit, the assessment page's Results tab opens automatically. There you'll see a list of your attempts, each with a status:
| Status | Meaning |
|---|---|
| Passed | You scored at or above the passing mark (only shown when score visibility is on) |
| Failed | You scored below the passing mark (only shown when score visibility is on) |
| Completed | You finished, but your teacher has scores hidden |
| Pending | You submitted, but the server hasn't finished grading yet |
| In progress | An attempt you haven't submitted |
| Late submission | You submitted during the grace period |
When your score appears
Your total score shows up on the Results tab only when both of these are true:
- Your teacher enabled score visibility for this assessment. This is a per-assessment setting the teacher chooses when creating it — some assessments are set to always hide the score (for example, a diagnostic quiz).
- A score has been recorded on the server. The status chip next to the attempt tells you where things stand: Pending means grading isn't done yet; Passed / Failed / Completed means a score is on file — if score visibility is on, the number is now visible.
How long the wait is depends on the question types:
- Auto-graded types — multiple choice, true/false, fill-in-the-blank, numeric, and matching. These are graded by the server as soon as you submit, so scores usually appear within a few seconds (once you're online) — assuming score visibility is on.
- Manually graded types — essay and image/document uploads. These require your teacher to review and grade each response. Scores stay Pending until the teacher finishes grading.
- Mixed assessments — if an assessment combines auto-graded and manually graded questions, the whole score stays Pending until every question has been graded.
If you don't see a number when you expect one, you'll see "Score not yet available" on the attempt. Pull down on the Results tab to refresh, or check back later. If it's been a while, ask your teacher whether grading has been completed or whether score visibility is turned on for that assessment.
Reviewing your answers
Tap any past attempt to open the review screen, where you can see each question, your answer, and (if your teacher allows) the correct answer.
Calendar
The Calendar tab shows your school's events — orientation days, exam schedules, holidays, program activities, and anything else posted by your school.
The calendar only shows events. Your weekly class schedule lives in Profile → Class Schedule (see chapter 9), and assessment due dates live inside each course's timeline (see chapter 5).
Reading the month grid
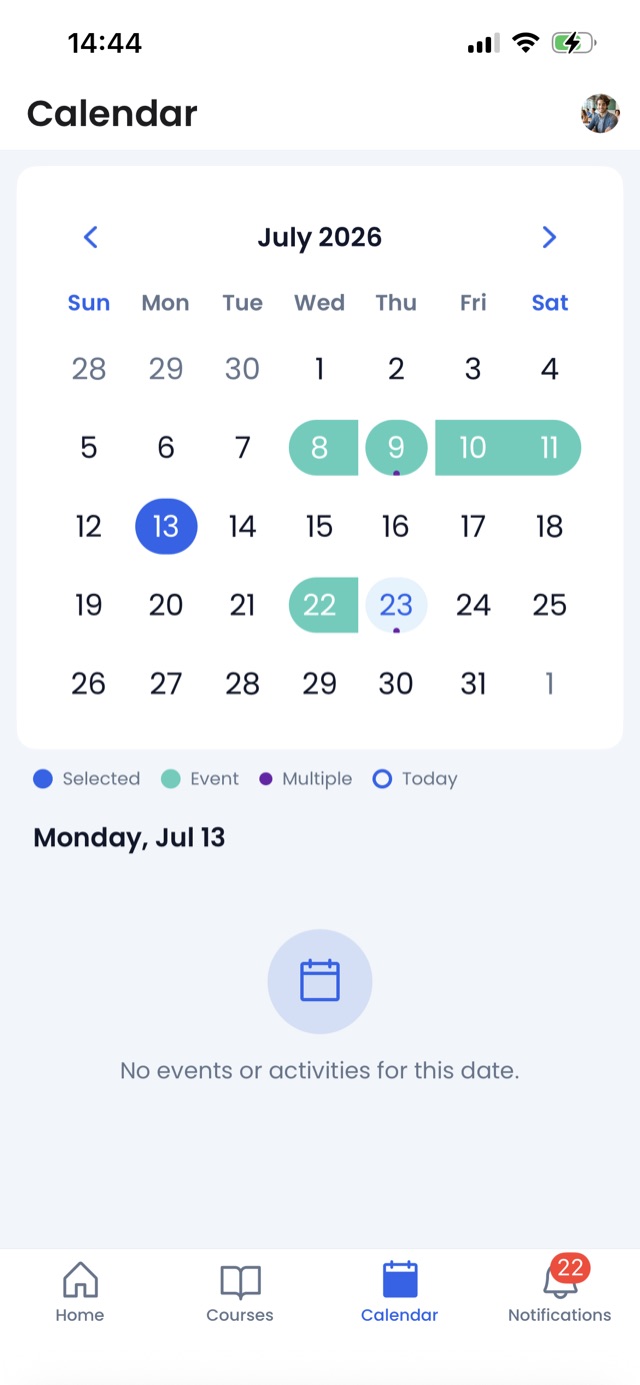
The grid at the top marks days according to what's on them:
- Selected day — highlighted with a filled accent-color pill
- Today — a lighter background with an accent-color number (shown when today isn't the selected day)
- Event days — filled with a teal-green pill that stretches across the event's date range (start day and end day are rounded on the outer edges)
- Multiple items on the same day — a small purple dot appears in the corner
A legend below the grid identifies the colors so you don't have to memorize them.
Changing months
Tap the ← and → arrows at the top of the month grid to move between months. When you're viewing a different month, a small Today button appears — tap it to jump back to the current day.
Viewing what's on a day
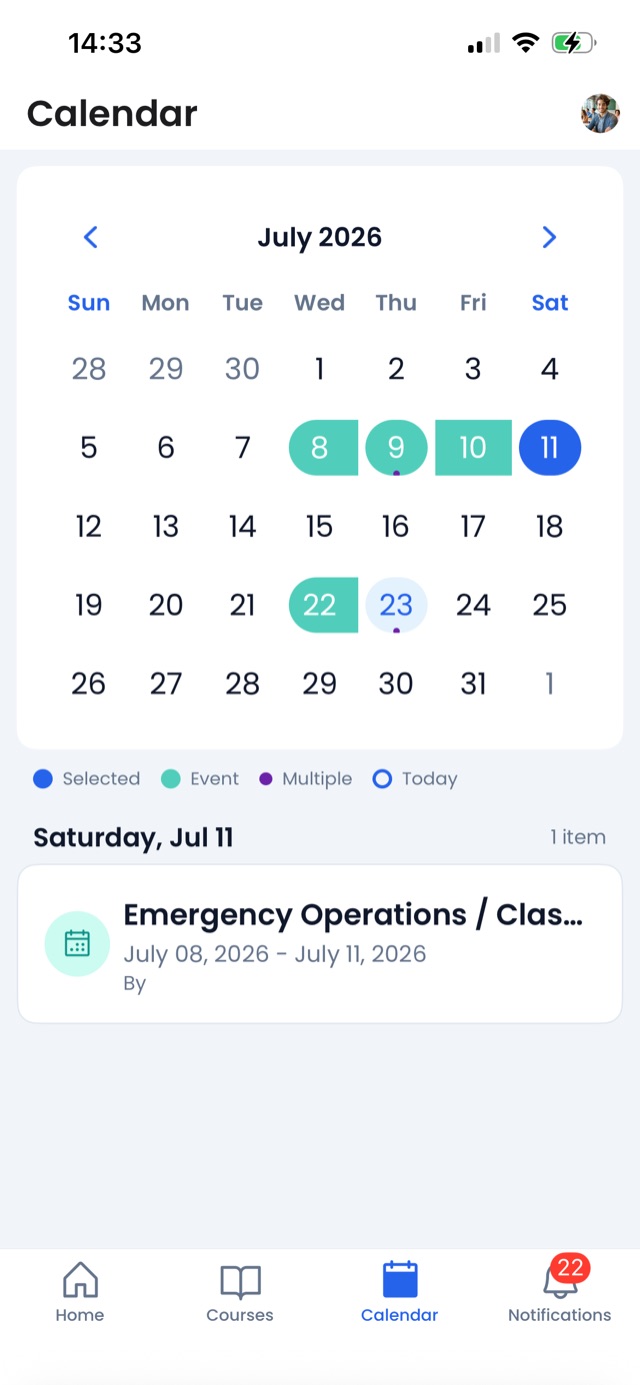
Tap any day to select it. Below the grid you'll see:
- A date header — "Today" if it's the current day, or "Sunday, Jul 22" otherwise
- The number of items on that day (e.g. "3 items")
- A list of events for the selected day, each with an icon, title, and (for multi-day events) a date range
Tap any event card to open its full details. If there's nothing scheduled, you'll see an empty state: "No events or activities for this date."
Announcements & Events
Announcements
Announcements are messages from your school or your teachers. There are two places to find them:
- On your Home screen — the latest few appear in the Announcements section at the bottom. Tap See all to open the full list.
- Inside a course — open a course → tap the Announcements filter chip on the timeline to see only that course's messages.
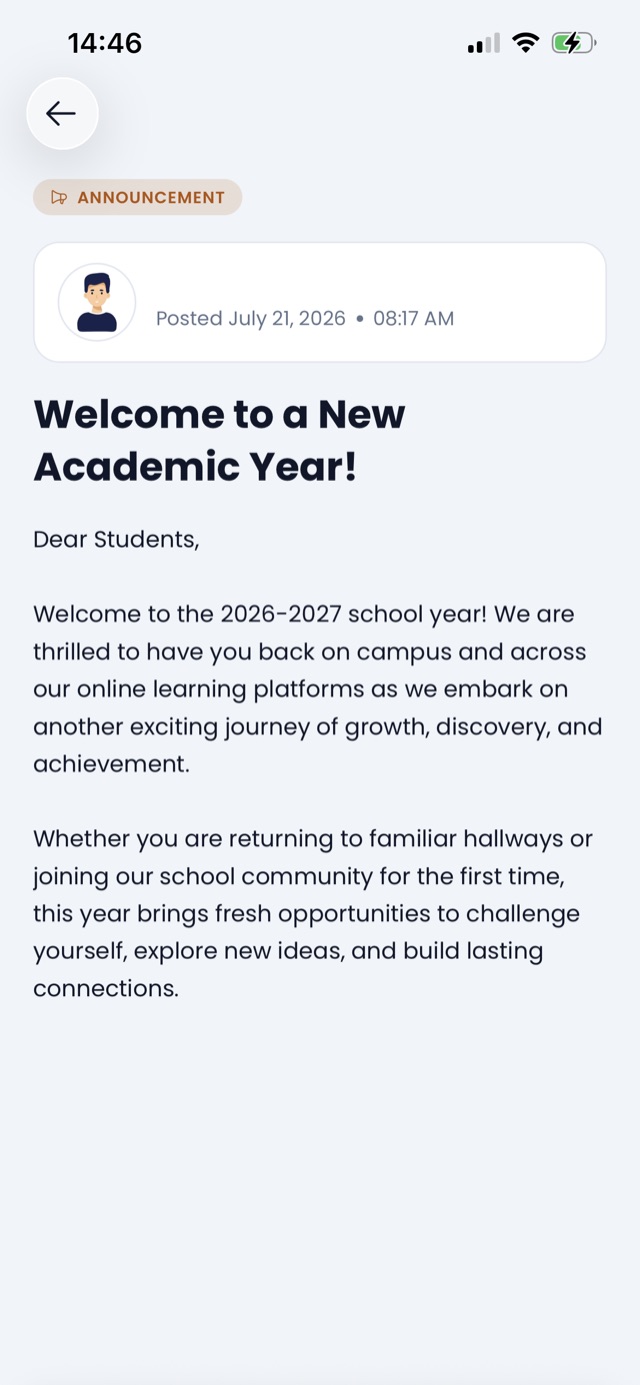
Tap any announcement to open its full view. On the details screen you'll see:
- The title and full message body
- Who posted it (with their avatar and name)
- When it was posted
- Any attachments the author included
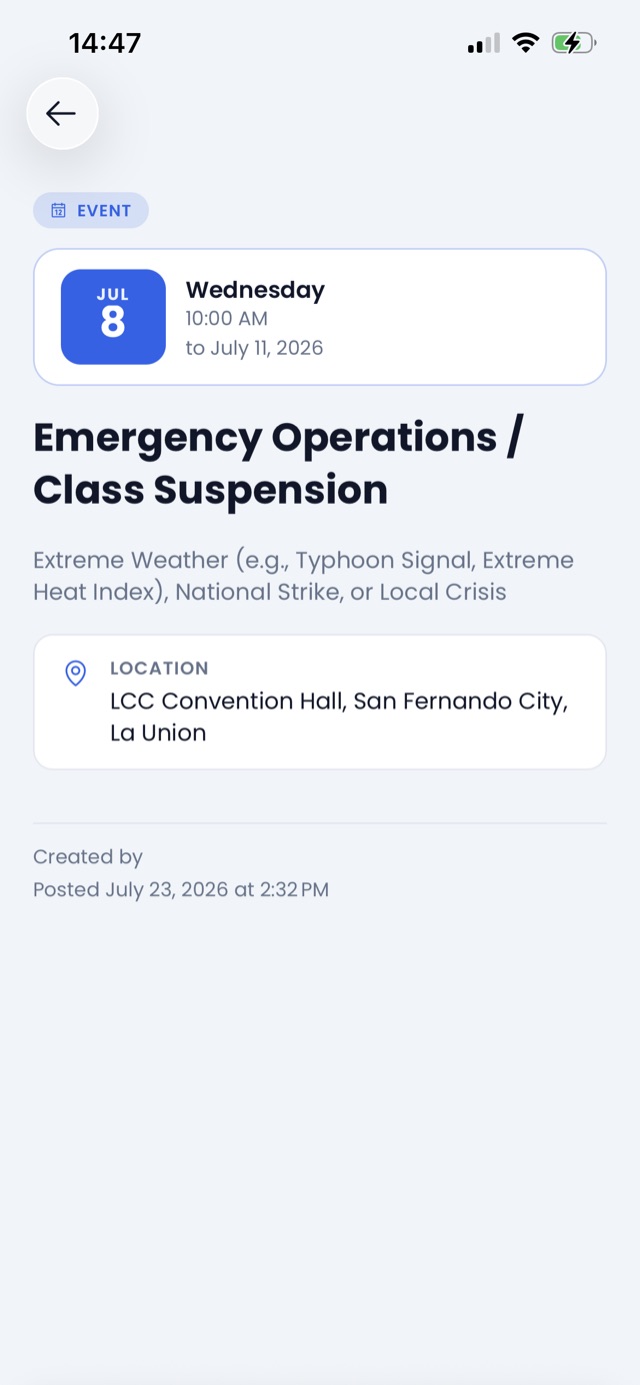
Events
Events are school-wide or program-wide activities — orientation days, exam schedules, holidays, program events, etc.
Events live on the Calendar tab (see chapter 6). Tap a day that has an event, then tap the event card to open its full details:
- The title and description
- The date and time (or date range for multi-day events)
- Any attachments the organizer included
Notifications
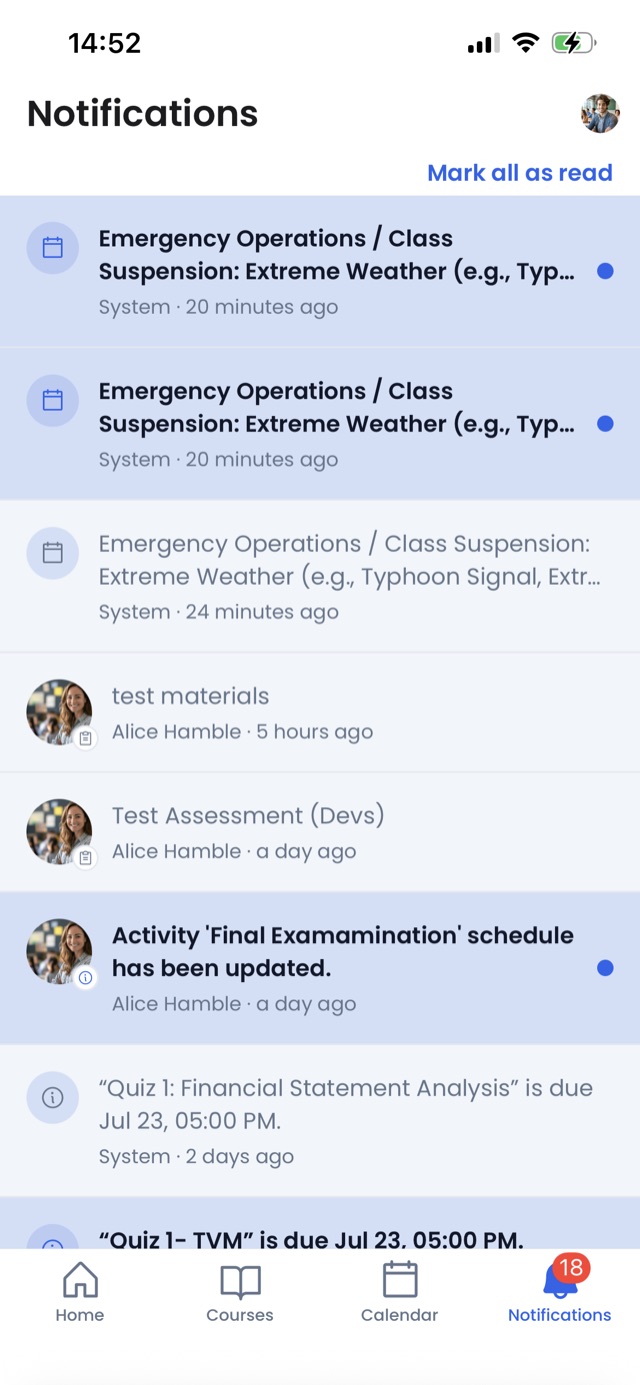
The Notifications tab is your running feed of everything the app has flagged for you — new announcements, new events, new assessments, and assessment reminders.
Reading the list
Each notification row shows:
- An avatar (with a small icon badge showing what kind of item it is — 📣 announcement, 🗓 event, 📋 assessment, 📖 lesson) or a plain icon when the notification is from the system rather than a person
- The message describing what happened
- The sender's name and how long ago the notification arrived (e.g. "Ms. Cruz · 2 hours ago")
- An accent-color dot on the right side of any unread notification
- Unread rows also have a soft highlighted background so they stand out
The tab icon shows a red badge with a number whenever you have unread notifications. The badge clears once every notification has been read.
Opening a notification
Tap any notification to jump straight to the item it links to (the announcement, event, or assessment). Tapping also marks it as read — the highlight and the dot both go away.
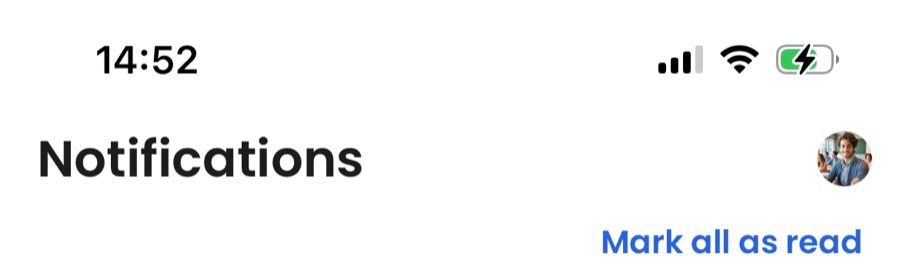
Mark all as read
When you have one or more unread notifications, a Mark all as read link appears at the top-right of the list. Tap it to clear every unread notification at once without opening them.
Refreshing
Pull down anywhere on the list to fetch the latest notifications. If you don't have any notifications yet, you'll see a friendly "You have no notifications yet" message with a bell-off icon.
Push notifications
You'll also receive push notifications on your phone's lock screen when:
- A new announcement is posted for you
- A new event is added
- An assessment is due soon or overdue
Make sure notifications are enabled in your phone's settings for ClassEdge, so you don't miss anything important.

Your Profile
To open your Profile:
- Tap your avatar at the top-right of any tab.
- In the bottom sheet, tap Your Profile.
What's at the top
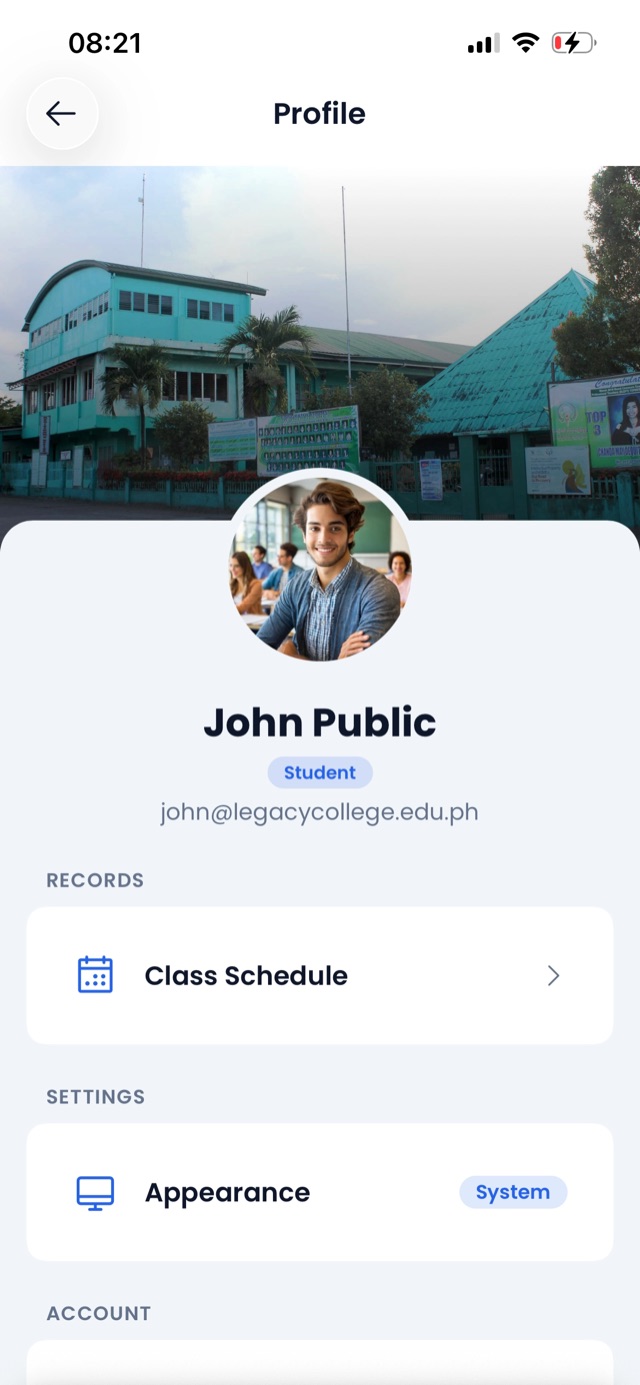
The top of the Profile screen shows:
- A school photo as the background header
- A large circular avatar — tap it to jump straight to your Profile Information page
- Your full name
- A small role pill (e.g. "Student")
- Your email address
- Your ID number (shown as "ID · 12345")
Records
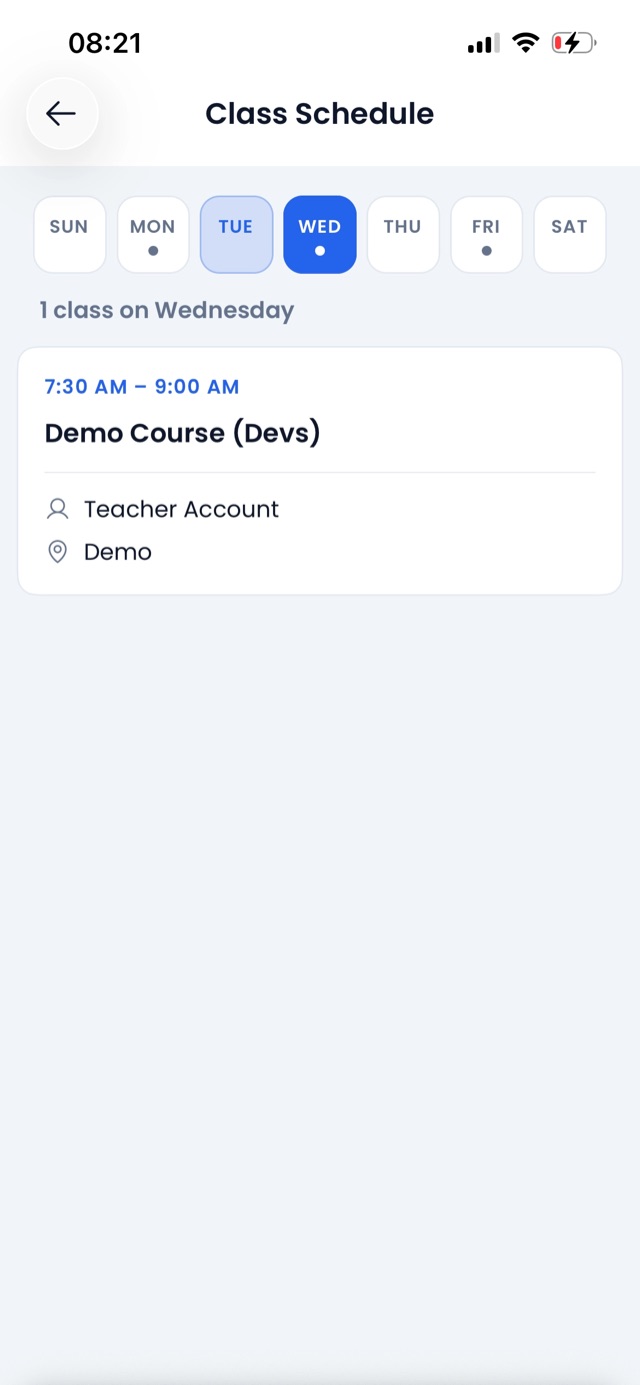
- Class Schedule — your weekly schedule of classes, showing days, times, subjects, rooms, and instructors.
Settings
- Theme — switch between light and dark mode. Follow-along-with-system is the default.
Account
- Profile Information — your basic details (name, email, student ID, program, year level). Some fields are editable; others are managed by your school.
- Log out — signs you out (see 2.4 Signing out for the full flow).
- Delete Account — permanently deletes your ClassEdge account. Tap it and follow the confirmation steps.
Deleting your account removes your app data. It does not remove your school records — for that, contact your school's registrar.
Working Offline
ClassEdge is designed to keep working even when your internet drops.
What works offline
- Reading downloaded materials
- Continuing an assessment attempt in progress
- Browsing your courses, announcements, and events
- Viewing your profile and schedule
What needs internet
- Logging in — every login goes through Microsoft SSO and 2FA, both of which need a connection.
- Submitting an assessment — your answers are saved locally as you go, but the actual submission needs to reach the server.
- Receiving new announcements, events, and notifications — they arrive as they're posted, but only when you're online.
- Refreshing your data — the sync engine can only pull new content while you're connected.
The network banner
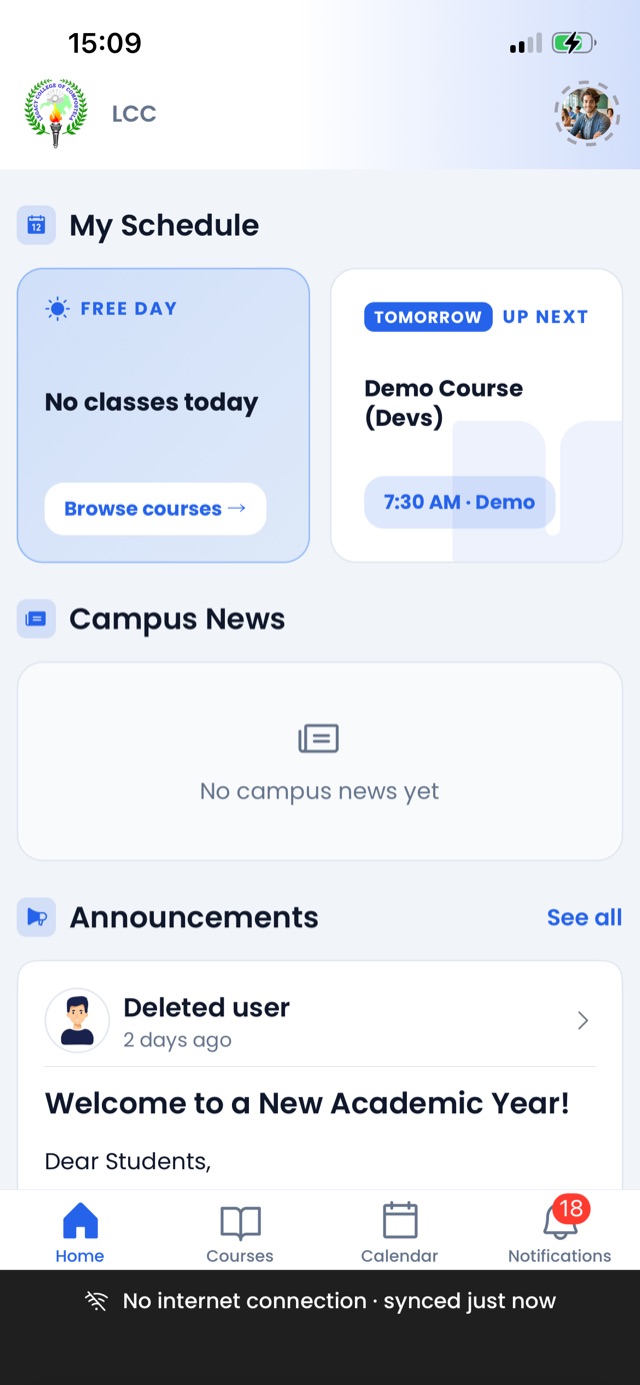
A slim network banner slides up from the bottom of the screen whenever your connection changes. It tells you what's wrong in one line, plus when the app last synced, so you know whether the data on-screen is fresh. You'll see one of these five states:
- No internet connection (dark grey) — your phone isn't connected to Wi-Fi or mobile data. Everything you do queues locally until you reconnect.
- Server unreachable (dark grey) — you are online, but the app can't reach the ClassEdge server. Usually a school-side or hosting issue — try again in a moment.
- Live sync unavailable (dark grey) — you're online and can reach the server, but the live-sync channel dropped. New data will arrive again once it reconnects.
- Reconnecting… (dark grey, spinning icon) — the app is actively trying to restore the connection.
- Back online (green) — briefly shown after a successful recovery, then slides away on its own.
For the three offline/unreachable states, the banner also appends when the app last synced — e.g. "No internet connection · Last synced 2:14 PM" — so you can tell how stale the data you're looking at might be. The banner never blocks the screen — it reserves its own row at the bottom so content shifts up to make room for it, and shifts back down when it slides away.
The Sync Center
Your avatar ring (top-right) already tells you the sync state at a glance — see Sync status on your avatar in chapter 3 for what each color means.
To manage sync yourself:
- Tap your avatar to open the account sheet.
- Tap Details › in the sync card at the top.
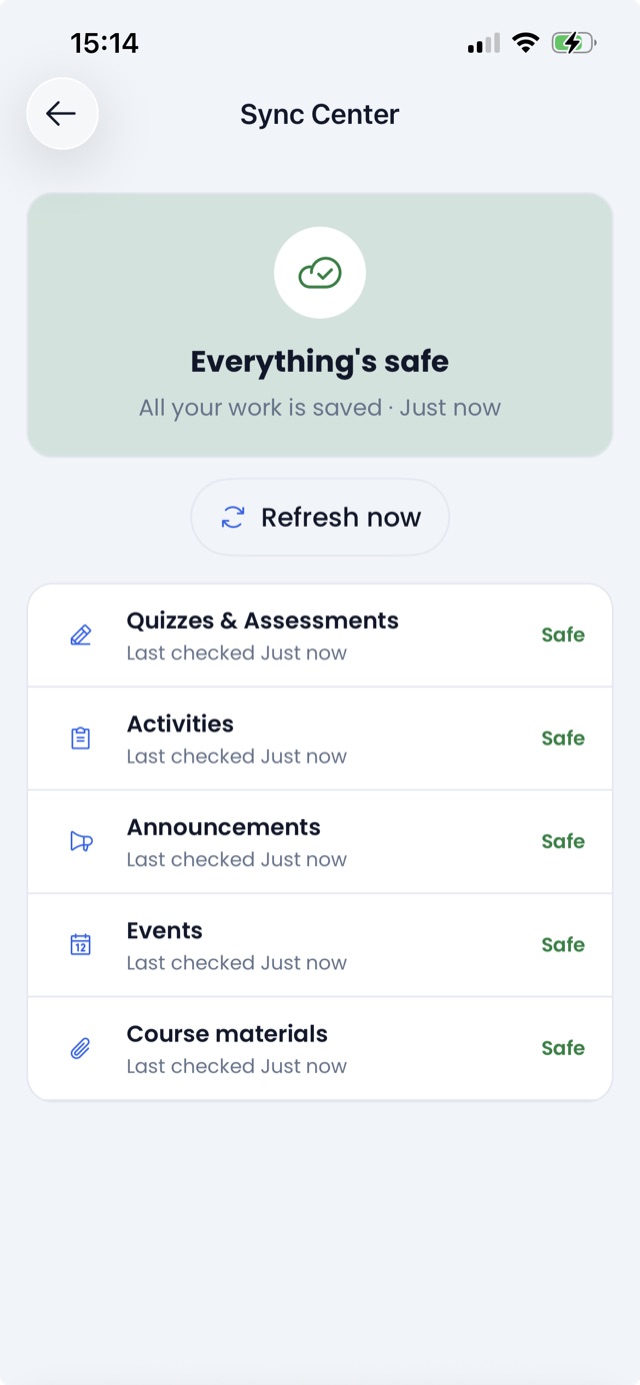
The Sync Center opens with:
- A summary of the overall status at the top
- A row per sync category showing when it last synced
- A Try again button next to any item that needs your attention
- A Force sync button at the bottom to re-run everything at once
Troubleshooting & FAQ
I can't log in
- "Sign-in failed" — double-check your school Microsoft email and password on the Microsoft page. If Microsoft accepts them but ClassEdge still won't let you in, your account may not be provisioned in ClassEdge yet. Contact your school's IT support.
- Stuck on a blank screen after signing in — close the app fully (swipe it away from the recent-apps view) and reopen it.
- Two-factor code not arriving — check your Microsoft Authenticator app, SMS, or phone call. If none work, use the "I don't have my phone" option on the Microsoft login page or contact IT.
I didn't get a notification
- Open your phone's Settings → Apps → ClassEdge → Notifications and make sure notifications are allowed.
- Make sure you're still signed in — you won't receive pushes if you've signed out.
- Some notifications take a moment to arrive after they're posted. Open the Notifications tab and pull down on the list to fetch the latest.
- Push delivery depends on your data or Wi-Fi being reachable — if you're offline, notifications will only arrive once you're back online.
My scores aren't showing
Your score only appears if:
- You've submitted the assessment.
- Your teacher has enabled score visibility for that assessment.
- Grading has been completed on the server.
If any of those aren't true, you'll see "Score not yet available." Check back later, or ask your teacher.
The app feels slow or stuck syncing
- Tap your avatar at the top-right — the top card of the bottom sheet tells you the current sync state.
- If it shows "X things need your attention" or "X items failed to sync", tap Details › to open the Sync Center and use Try again on the affected item.
- If the ring around your avatar is grey, you're offline — reconnect to Wi-Fi or mobile data and it should recover on its own.
- If nothing helps, sign out and sign back in (see 2.4 Signing out).
If your phone is more than 5–6 years old, the app may feel sluggish or crash occasionally — ClassEdge does a lot in the background (offline sync, downloaded materials, live updates) and older hardware struggles with it. A newer device (ideally one running Android 10 or later) will run the app much more smoothly.
I lost my internet connection during an assessment
Your answers are saved on your phone as you go. When you're back online:
- Reopen the assessment.
- Tap Continue.
- Finish and Submit.
If your submission fails, the app will keep retrying in the background until it succeeds.
I want to change my password
Passwords are managed by Microsoft, not by ClassEdge. Change it through your school's Microsoft account portal (or ask IT support to reset it). The next time you sign in, use the new password.
Something else is wrong
Contact your school's IT support with:
- Your name and student ID
- What you were trying to do
- A screenshot of any error message
- Your Android device model and OS version